My best wishes for you all during this New Year's weekend - may 2012 bring you happiness and peace! It has been a banner year for the Onondaga Cutoff - the introduction of DCC, installation of the engine yard and short line, as well as all the on-line industrial sidings; the start of backdrop installation, and the beginning of the operation of the railroad. It's a dream come true and I am very thankful for the progress and for the help of all those that have supported this project!
Stay tuned for plenty more coming in 2012!
~RGDave

Preparation and construction of a basement-sized, HO-scale model railroad based on Conrail's operations through Central New York on the Chicago Line in 1994.
Thursday, December 29, 2011
Monday, December 19, 2011
Operational Improvements
Happy Holidays to all! With Christmastime approaching, this is always a busy time of year, but the long evenings make for some time to work on the model railroad. Recently, I have been making some improvements that have come to mind during the recent operating sessions.
One of the big decisions was to go ahead and install bi-color light-emitting diodes (LED) in all of the interlocking model boards to function as indicator lights for turnout position. Due to my use of the stall-type switch machines, I was able to simply wire each LED in series with the switch motor, and the constant DC power that is applied will light each LED. Since the machines move when the polarity of the DC source changes, it works well to make the LED green (normal) or red (reverse) in tandem with the points moving.
 Here, we see the model boards at CP 282, the west end of Onondaga Yard, and at CP 274 below, the 'west end' of staging. The cardboard, of course, is temporary, and will be upgraded to a permanent material after the full fascia board is in place.
This particular upgrade is evidence of my philosophy during construction - any upgrades made must minimize the possibility that any work will need to be done twice. In this case, adding LED indicator lights was about 10 hours of work, but it is work that I do not need to do again, since the toggles and lights will simply be transferred to the permanent boards in the same configuration you see here. In the mean time, the operation will be greatly improved, since operators now can easily see how the route is lined ahead, instead of having to always be checking switches.
Another upgrade underway is to tighten my tolerances for freight car standards. Long trains and grades take a toll on freight cars and those that have high or low couplers cause issues during the sessions. Further, the plastic knuckle couplers that come with most kits these days simply are not of high enough quality for a real operating layout like this - there is too much stress, and the plastic deforms. Therefore, all my cars are going through the shop to install Kadee metal couplers, and to ensure that the coupler height is correct.
As I have had time, I also have recently been setting new locomotives up for service. Conrail's Albany Division was always a home for Dash-7 series GE locomotives in the 1990's, and so my railroad is no exception. Over the last month I have made time to install TCS decoders in both of my new Atlas CR B23-7's, seen here at Onondaga Diesel:
 These units were delivered to Conrail in the Spring of 1979, and both were looking rather worn by 1994. And so my weathering reflects that. The Dash-7's add a sense of place to the railroad and will spend most of their time in yard and local service.
Finally, a profile shot of 1987 for you:
 Merry Christmas to all!
~RGDave
One of the big decisions was to go ahead and install bi-color light-emitting diodes (LED) in all of the interlocking model boards to function as indicator lights for turnout position. Due to my use of the stall-type switch machines, I was able to simply wire each LED in series with the switch motor, and the constant DC power that is applied will light each LED. Since the machines move when the polarity of the DC source changes, it works well to make the LED green (normal) or red (reverse) in tandem with the points moving.

This particular upgrade is evidence of my philosophy during construction - any upgrades made must minimize the possibility that any work will need to be done twice. In this case, adding LED indicator lights was about 10 hours of work, but it is work that I do not need to do again, since the toggles and lights will simply be transferred to the permanent boards in the same configuration you see here. In the mean time, the operation will be greatly improved, since operators now can easily see how the route is lined ahead, instead of having to always be checking switches.
Another upgrade underway is to tighten my tolerances for freight car standards. Long trains and grades take a toll on freight cars and those that have high or low couplers cause issues during the sessions. Further, the plastic knuckle couplers that come with most kits these days simply are not of high enough quality for a real operating layout like this - there is too much stress, and the plastic deforms. Therefore, all my cars are going through the shop to install Kadee metal couplers, and to ensure that the coupler height is correct.
As I have had time, I also have recently been setting new locomotives up for service. Conrail's Albany Division was always a home for Dash-7 series GE locomotives in the 1990's, and so my railroad is no exception. Over the last month I have made time to install TCS decoders in both of my new Atlas CR B23-7's, seen here at Onondaga Diesel:

Finally, a profile shot of 1987 for you:

~RGDave
Tuesday, November 22, 2011
Autumn Progress
Well, the first two operating sessions are now on the books for the Onondaga Cutoff - both were great successes, and a lot of fun. Ops sessions have taught me a lot about the railroad that I would not have realized myself, and so there are some things that need to be changed as we go forward. Thankfully, though, they are minor, and the general design of the railroad works very well for heavy-duty mainline operation.
More on that later. There has also been some good construction progress on the railroad - first, the final benchwork, trackwork, and wiring of track was completed with the installation of the major online industry on the main line. Iroquois Paper is now operational, with space-holder structures coming soon to represent the big paperboard plant.
 The main line is off to the left, and you can see the lead, which comes into the runaround immediately. The switching lead comes through the curved turnout in the foreground and runs out about 8 car lengths to allow for building the outbound turn from Onondaga Yard. Likewise, an east lead does the same thing to allow the turn to switch the industrial tracks on the right. Iroquois will receive loads of clay slurry, paper scraps, and coal (for the onsite power plant), and ship out loads of finished cardboard and paperboard.
Another big development is the installation of masonite backdrops, seen here at CP 282 - not much to say about it except that it dramatically makes the railroad seem longer, since you can no longer see across the room!
 This will eventually be painted as distant horizon and sky, which will be a major improvement. But for now, especially for operating sessions, it is a good view block and really helps to give the sense that the railroad goes somewhere.
Also visible above is a tool I installed to assist with operations after some suggestions that came during the firs operating session - a manual block system. During the first session, crews had trouble seeing where interlockings started and stopped, and were unsure about where to stop trains when the dispatcher ordered different moves. Therefore, I fabricated signal masts from leftover sprues, colored paper, and paint; now each interlocking is 'signaled' which allows the dispatcher, during ops sessions, to route trains by signal indication. While fully manual, it does allow crews to easily identify the limits of an interlocking, and so far has been beneficial.
Another exciting process has been the set-up of some new power for the Onondaga Cutoff - among others, freshly delivered to the railroad is SD60I 5544, with a builder's date of 1994. It and a sister will be among the newest power modeled on the railroad.
Here's a roster shot:

And a shot showing the locomotive leading train SEIN:

New power is something everyone can get excited about! I like how the 'clean' paint on 5544 contrasts with the weathering on 6789 and my other Conrail power.
Now, we're entering the holiday season, which is a busy time for all - but as winter comes, the time spent on the model railroad will increase. Plenty more to come soon!
Happy Thanksgiving!
~RGDave
More on that later. There has also been some good construction progress on the railroad - first, the final benchwork, trackwork, and wiring of track was completed with the installation of the major online industry on the main line. Iroquois Paper is now operational, with space-holder structures coming soon to represent the big paperboard plant.

Another big development is the installation of masonite backdrops, seen here at CP 282 - not much to say about it except that it dramatically makes the railroad seem longer, since you can no longer see across the room!

Also visible above is a tool I installed to assist with operations after some suggestions that came during the firs operating session - a manual block system. During the first session, crews had trouble seeing where interlockings started and stopped, and were unsure about where to stop trains when the dispatcher ordered different moves. Therefore, I fabricated signal masts from leftover sprues, colored paper, and paint; now each interlocking is 'signaled' which allows the dispatcher, during ops sessions, to route trains by signal indication. While fully manual, it does allow crews to easily identify the limits of an interlocking, and so far has been beneficial.
Another exciting process has been the set-up of some new power for the Onondaga Cutoff - among others, freshly delivered to the railroad is SD60I 5544, with a builder's date of 1994. It and a sister will be among the newest power modeled on the railroad.
Here's a roster shot:

And a shot showing the locomotive leading train SEIN:

New power is something everyone can get excited about! I like how the 'clean' paint on 5544 contrasts with the weathering on 6789 and my other Conrail power.
Now, we're entering the holiday season, which is a busy time for all - but as winter comes, the time spent on the model railroad will increase. Plenty more to come soon!
Happy Thanksgiving!
~RGDave
Thursday, October 27, 2011
A Success!
The first operating session on the Onondaga Cutoff was a success! We ran trains from about 7 until about 11 p.m., accomplishing all the work I'd come up with for the crews to do, and having a lot of fun in the process. One of the great things about the session was that I learned a lot about about the layout!
We ran with a crew of 6 - a dispatcher, two-man crews for the M&E and for the road local, and one-man crews for the road freights. Based on feedback from the operators, we will likely post someone full-time in the yard to assist road freights for setting out next time. There are also a few infrastructure issues I will work to address. There was only one collision, a rear-ender that was a simple mistake and that we have now taken steps to prevent - from now on, every move needs an engineer for a full trip on the head end after turnouts are thrown to ensure proper routing.
 From left to right, we have Scottie, John, Nick, Jack, me, and Mark. I appreciate their help and enthusiasm! One thing I realized very quickly is that this model railroad is a LOT more fun when there's an operating session, so we're already scheduled for the next one!
Let me know if you might be in NJ anytime, with a few days notice there's a chance you can operate too. It only gets better from here!
~RGDave
We ran with a crew of 6 - a dispatcher, two-man crews for the M&E and for the road local, and one-man crews for the road freights. Based on feedback from the operators, we will likely post someone full-time in the yard to assist road freights for setting out next time. There are also a few infrastructure issues I will work to address. There was only one collision, a rear-ender that was a simple mistake and that we have now taken steps to prevent - from now on, every move needs an engineer for a full trip on the head end after turnouts are thrown to ensure proper routing.

Let me know if you might be in NJ anytime, with a few days notice there's a chance you can operate too. It only gets better from here!
~RGDave
Friday, October 14, 2011
Operation
With the fall come many activities that keep me busy and away from the model railroad. However, I have had time to keep pushing forward on a few more decoder installations as well as some other 'below the layout' items.
The biggest news is that I have three separate cabs now for my DCC operations - the NCE controller (PowerCab) that came with my PowerPro 5-amp system, an NCE Cab 04ER, and the most recent addition, an NCE Cab 06R. All are full radio controlled and can work simultaneously, which will be a lot of fun as we begin to do some operating sessions on the railroad!
For a backup, I also installed three separate plug-in UTP ports around the layout. Each radio cab is battery-powered, and all have worked very well so far. However, should the batteries fade during a session, or should the radio have issues for any reason, I wanted a hard-wired backup so that trains could be controlled either way.
So, operating sessions will begin soon - informally at first, taking some notes and making things up as we go along, and then more formally soon with regular symbol freights working specific tasks during a session. Exciting! Photos to come soon!
Wednesday, September 14, 2011
Onondaga Engine Terminal
The work is coming to a head at the Onondaga Locomotive Facility - shops are complete, track is in place awaiting wiring, and most turnouts have ground throws! While I am planning to add on a shop office to the main shop building and a moderate sand & fuel facility, we are getting close here - finally.
First, a shot of the shop complex itself:
 I painted and weathered the structure and added hanging lights and miscellaneous details, but most of it is stock. It is a complicated, time-consuming kit but very worthwhile when done.
The shop tracks continue for a full two feet past the structure to a back-shop area. Tracks in the foreground will be 'Ready' tracks that will also have the fueling and sanding racks on them. The closest one is not glued in place so as to be adjustable, depending on the exact dimensions of the sanding facility.
Next, here's an overview of the whole engine terminal:
 Far left is the MOW storage facility for snow-fighting equipment, MOW cars, and long-term locomotive storage. Then we have the #1 lead, followed by the shop ladder that takes you to bays #2 and #3. Ready tracks are to the right in this view, and in the foreground we have the mainline and yard throat at CP 280.
The shop looks pretty awesome at night...methinks there will be lots of lit structures on the railroad eventually:


First, a shot of the shop complex itself:

The shop tracks continue for a full two feet past the structure to a back-shop area. Tracks in the foreground will be 'Ready' tracks that will also have the fueling and sanding racks on them. The closest one is not glued in place so as to be adjustable, depending on the exact dimensions of the sanding facility.
Next, here's an overview of the whole engine terminal:

The shop looks pretty awesome at night...methinks there will be lots of lit structures on the railroad eventually:

Finally, a quick image of C36-7 6639, resting in the Park Yard awaiting a completed engine facility. Once the wiring is in place, it's going to be time to add decoders to a bunch more locomotives to fill up the facility!

Enjoy - plenty coming soon as the weather cools and there is less outside work to do. Over the course of the winter, we will start 'officially' operating the railroad, and major features will go in place - the backdrop, full lighting, etc. Stay tuned!
~RGDave
Sunday, August 28, 2011
Chasin' the M&E
Tonight, I'm home with a hurricane pouring rain down outdoors. So, I finally got the camera out and made some images for you of the newly-finished track for the shortline, including a chase over the 'full' route from Euclid Yard up to Onondaga.
 We begin at the Euclid engine house where our crew has started up the 19 and the recently-repainted 81. The crew boards and lines the switches into the yard to put their interchange train together, which today is just 3 freshly-rebuilt cars from Central Car Repair.
 As the lashup rumbles out of the house, we get our first good view of the 81 - the M&E ownership decided on a CN-inspired paint job for this ex-SAL RS-3. 81 will lead the run up to the interchange today.
 It doesn't take long to get out to the storage tracks in Euclid Yard, and once they make the pickup, the crew does the brake test and heads out of town to the north.
 We have a chance to scoot ahead to catch the train coming out of Smirnoff Tunnel, one of several summits on the way to the interchange. The train has crested that grade here and is coasting downhill towards the lowest point on the M&E, Skaneateles Creek.
 The two Alcos rumble out across the big thru-truss over Skaneatles Creek, coming out into the sunlight. The engineer will throttle up now for the climb up Clarence Hill.
 As is often the case upon arriving at the interchange, M&E this morning is holding for mainline traffic to clear before they can make their move across the mainline to interchange. Conrail train TOSE, with a C30-7A/C36-7/C39-8 lashup, roars east on Track 2.


M&E spends some time setting their train out, and then pulls to the east end to make their move back towards home. Meanwhile, TOSE had also stopped to drop and add locomotives. C36-7 6639 had to be cut out, and NS SD70 2537 was added in its place. Here we see M&E 19 leading the 81 back west through CP 280 on the North Runner while TOSE leans into the big turn east of the yard.
What a fun way to spend a night during a hurricane!
~RGDave
Friday, August 12, 2011
Another Big Step
Last night, the first train ran the length of the shortline - M&E 19, an Alco C424, led a flatcar and gondola 'work train' to the yard to 'assist in the clean up from construction.' Actually it was just an excuse to test things out a bit, and all went pretty well!
As with other parts of the layout, the industrial siding alignment is not going to be finalized until I have assembled all the rail-served structures, which will take some months. In the mean time, I am using mock-ups and temporarily located tracks so that operations can begin.
Photos and a full writeup coming soon!
~RGDave
Friday, July 29, 2011
Thinkin' Like A Shortline
Yard design for the M&E was recently completed, at least regarding the general layout of the tracks. The yard area will be dominated by the major industry, the 'anchor' customer for the short line: the Doelger Brewery. Named after the real Peter Doelger Brewery, which was one of the largest breweries in New York City in the 1800's, my version will recieve barley and grains via rail, and will ship bottled beer.
I figure that's a great industry to have on a model railroad!
Here's a little diagram of the current plan for the track layout at Euclid. The brewery, located on the north side of the yard, will have another turnout and two longer sidings; one will accept loaded hoppers, the other will load insulated and refrigerated boxcars.
 Designing a stub-end yard like this is challenging, due to the fact that as a train arrives, the engines will be at a dead-end and must run around the train before switching. Therefore, you must maximize the length of the runaround - in this case, the first switch is part of the runaround, as is the last one. This should allow two 4-axle units to run around a train of the maximum length - for me, I have just under 8 feet, with equates to about two engines and 12 cars. I think that's longer than almost any train I will run on the steep grades of the M&E.
Tracklaying is under way, photos of the new yard coming soon!
~RGDave
I figure that's a great industry to have on a model railroad!
Here's a little diagram of the current plan for the track layout at Euclid. The brewery, located on the north side of the yard, will have another turnout and two longer sidings; one will accept loaded hoppers, the other will load insulated and refrigerated boxcars.

Tracklaying is under way, photos of the new yard coming soon!
~RGDave
Sunday, July 10, 2011
Progress on Several Fronts
As the summer digs in, large blocks of time for layout construction are few. However, with the water meter repaired, I have moved forward with several major projects as time allows.
First, the engine facility at Onondaga Yard is taking shape. Here is an image of it, test-fit on location. The servicing platforms and pit tracks are in place and the columns are attached, awaiting bracing and walls. Once the entire structure is complete, it will be installed, and I can finish tracklaying in the engine yard. Conrail C32-8 6611 sits in the facility to give some sense of scale:

Also, the bridge at Skaneateles Creek on the short line is now weathered and permanently in place:
 Built from a kit, this bridge received a heavy dose of weathering to represent a structure on a short line without much money to paint bridges. Still to come here are the guard rails and final abutments, but I'm excited with how this came out.
A close-up view of one of the weathered gusset plates:

Having that bridge in place has allowed me to lay track up to and through the staircase:

Now that the shortline's route is in place up to Eulcid Yard, it was time to put the yard roadbed in place. With a large, stub-ended area, I decided to try 1" thick insulation foam as a base. I attached it with latex adhesive caulk, and then clamped and weighted it to ensure good adhesion. Here is the progress before removing the weights:

So, plenty of progress, little by little! I will continue working on the engine terminal and shortline in order to try and finish tracklaying before the end of the summer; then once the shortline is operational, it will be time to take a shot at backdrops. That promises to change the overall look dramatically!
Enjoy the summertime and stay tuned!
~RGDave
First, the engine facility at Onondaga Yard is taking shape. Here is an image of it, test-fit on location. The servicing platforms and pit tracks are in place and the columns are attached, awaiting bracing and walls. Once the entire structure is complete, it will be installed, and I can finish tracklaying in the engine yard. Conrail C32-8 6611 sits in the facility to give some sense of scale:

Also, the bridge at Skaneateles Creek on the short line is now weathered and permanently in place:

A close-up view of one of the weathered gusset plates:

Having that bridge in place has allowed me to lay track up to and through the staircase:

Now that the shortline's route is in place up to Eulcid Yard, it was time to put the yard roadbed in place. With a large, stub-ended area, I decided to try 1" thick insulation foam as a base. I attached it with latex adhesive caulk, and then clamped and weighted it to ensure good adhesion. Here is the progress before removing the weights:

So, plenty of progress, little by little! I will continue working on the engine terminal and shortline in order to try and finish tracklaying before the end of the summer; then once the shortline is operational, it will be time to take a shot at backdrops. That promises to change the overall look dramatically!
Enjoy the summertime and stay tuned!
~RGDave
Thursday, June 23, 2011
SUCCESS!
In a refreshing development, we are back on track for progress on the Onondaga Cutoff! The leaks in the plumbing system that have delayed progress on the benchwork are now repaired, including the pesky ones on the domestic water supply main. Valves have been replaced, and the whole meter arrangement stabilized, so we should be good here for some time.
Tonight, I made some major progress. Here is a photograph of the new landing for the stairway as viewed from the basement floor, including the supporting studs for the meter and the future big turn in the short line.
 The new landing is assembled from left-over lumber from layout progress as well as a variety of plywood from other home projects - it pays to save bigger 'scraps' as they always come in useful somewhere down the line in an old home.
Next, here's a view looking down the stairway into the basement, with Clarence watching curiously if you look carefully.
 The benchwork for the shortline that was constructed previously comes in from the top right. Now, finally, with all supporting studs in place atop a very solid landing assembly, it was time to install the last of the benchwork on the shortline - which finishes all benchwork with the lone exception of one last industry that will go in shortly.
An overall, ground-level view of the long-awaited benchwork for the Minoa & Euclid:
 Visible here is the whole deal: the tunnel in the stairs at top left, the grade down to Skaneateles Creek (the bridge for which sits where it will be permanently installed after weathering), and the first pier supporting the roadbed along the front wall. Behind the camera is the west end of Onondaga Yard.
Heat and humidity outdoors is a good reason for me to keep moving on the model railroad. Tracklaying, wiring, and the engine yard construction coming next!
~RGDave
Tonight, I made some major progress. Here is a photograph of the new landing for the stairway as viewed from the basement floor, including the supporting studs for the meter and the future big turn in the short line.

Next, here's a view looking down the stairway into the basement, with Clarence watching curiously if you look carefully.

An overall, ground-level view of the long-awaited benchwork for the Minoa & Euclid:

Heat and humidity outdoors is a good reason for me to keep moving on the model railroad. Tracklaying, wiring, and the engine yard construction coming next!
~RGDave
Thursday, June 16, 2011
Not So Fast
Well, the leaks were not quite fixed...and as always, Rick was the one to lend a hand - years of work in HVAC have made him a very competent handyman, and sure enough, as we sweated the leaking joint apart, he immediately saw the problem and taught me how to see it and repair it.
And...all dry now; even late last night before bed, all dry.
Photos coming soon to show the framework I constructed to support the meter arrangement and allow for the final benchwork on the shortline as well, all atop a new landing.
For now, home projects = layout progress too.
~RGDave
And...all dry now; even late last night before bed, all dry.
Photos coming soon to show the framework I constructed to support the meter arrangement and allow for the final benchwork on the shortline as well, all atop a new landing.
For now, home projects = layout progress too.
~RGDave
Wednesday, June 1, 2011
A Fixed Leak, and New Stair Landing
The long standing leak in the water meter assembly seems to have been addressed! Thanks to leadership and help from a neighbor who does HVAC plumbing professionally, the water main into the house has never looked better.
My thought quickly turned to the unstable landing on the stairway that was below the meter for 60 years. It was soft and off-level, and my thought was that there was significant rot beneath the surface. I was right. Since the new shortline will need to have several supports on the landing, I decided replacing the landing and stabilizing the bottom of the staircase was in order.
 So, I demolished the landing on Memorial Day, and cleaned up the mess while being very careful to avoid damaging the meter assembly (seen on the wall in this view). Also visible here are the shortline coming in from the right, and also if you look carefully, the benchwork for the stair-tunnel on the 5th step at the upper left.
I put several hours in to engineering a new landing on an uneven concrete floor, including brick risers to keep the 'green' lumber out of the moisture as much as possible. The landing is now in. Tonight I will construct the final step, install finishing trim, and attach the staircase to the landing.
All of this is in the name of 'basement projects' before the layout, which has included replacing all galvanized water pipes, replumbing the entire downstairs bathroom, installing a new boiler, installing a new oil tank...
Finally, an action shot for you, as I switched Onondaga Yard with CR 2795 while the mortar set beneath the brick risers for the new landing...
 All for now!
~RGDave
My thought quickly turned to the unstable landing on the stairway that was below the meter for 60 years. It was soft and off-level, and my thought was that there was significant rot beneath the surface. I was right. Since the new shortline will need to have several supports on the landing, I decided replacing the landing and stabilizing the bottom of the staircase was in order.

I put several hours in to engineering a new landing on an uneven concrete floor, including brick risers to keep the 'green' lumber out of the moisture as much as possible. The landing is now in. Tonight I will construct the final step, install finishing trim, and attach the staircase to the landing.
All of this is in the name of 'basement projects' before the layout, which has included replacing all galvanized water pipes, replumbing the entire downstairs bathroom, installing a new boiler, installing a new oil tank...
Finally, an action shot for you, as I switched Onondaga Yard with CR 2795 while the mortar set beneath the brick risers for the new landing...

~RGDave
Friday, May 27, 2011
FIXED...
...at this point, at least! The leak was addressed in a two-man, 3-hour work session last night and so far, so good. We will give a week or two, minimum, to ensure that it really is leak-free, and then it's time to connect the final benchwork section of the short line and to complete track laying there.
Lots of major progress, coming soon on the Onondaga Cutoff!
~RGDave
Lots of major progress, coming soon on the Onondaga Cutoff!
~RGDave
Wednesday, May 18, 2011
The Waiting
Progress on the water meter work has stalled, pending support from the local water department. Due to a stuck valve at the curb, they will need to dig up the front yard and replace the valve before we can do the work inside - a major headache! On the bright side, once this work is done, I will essentially have modern valves and plumbing over most of the system in the home.

In the mean time, I continue to wire locomotives for DCC, and I recently took delivery of the structure kit that will be the locomotive shop in the Onondaga Diesel Terminal. Here is the Walthers promo shot of the assembled structure:

Of course, mine will have Conrail locomotives instead, but you get the idea! Having this structure in hand allows me to finally lay all the tracks in the Locomotive facility, which to this point had been on hold since I need to match the ladder track with the spacing in the floor of the facility.
Coming soon is backdrop installation and painting. Masonite seems to be a popular choice for backdrop material, and at this point, that is the direction I am leaning - aluminum flashing will be expensive and also will have less stability for painting.
I have found the trick with building a large model railroad and keeping progress going is to keep working on something, even when one job is interrupted by circumstance. With shortline benchwork (and therefore trackwork) stalled awaiting the new water meter arrangement, I have kept working on other projects.
Even the waiting keeps me busy!
~RGDave
Thursday, May 5, 2011
Tehachapi & The Mojave Desert
All the images from the April 2011 California Trip are now online for your viewing pleasure.
Tehachapi Pass: http://rgdave.rrpicturearchives.net/archivethumbs.aspx?id=66965
A few examples:


And, the Mojave Desert: http://rgdave.rrpicturearchives.net/archivethumbs.aspx?id=66966
Enjoy! More model railroading to come soon!
~RGDave
Tehachapi Pass: http://rgdave.rrpicturearchives.net/archivethumbs.aspx?id=66965
A few examples:


And, the Mojave Desert: http://rgdave.rrpicturearchives.net/archivethumbs.aspx?id=66966
Enjoy! More model railroading to come soon!
~RGDave
Friday, April 22, 2011
To Finish the Shortline's Benchwork...
I have a quick update for you, another 'what happens when you build a permanent model railroad in an old house' post.
To complete the shortline benchwork, I need to build only about 8 linear feet of remaining subroadbed. We are CLOSE! It will connect the stair-tunnel, which is already in place, with the bridge for Skaneateles Creek, which is ready to go as well. However, it is anything but conventional. This will be a 90-degree, 20" radius turn that needs two 3-foot approaches, and the whole thing is built right along a stone foundation, over the wooden landing from the stairs, and beneath the electrical panel on the wall.
Further, the big turn will be in front of the domestic water supply and meter for my home. As I was measuring, I noticed some wet drips from the unions around the meter...
 See all that nice blue-green color? Yup. Corroded copper line. The water company was called, and came to look only to advise that they do the meter, not the unions, so this is my problem. This is upstream of my shut-off valve, which complicates things as they need to turn off our supply at the curb for us to even do this work. I do most of my own plumbing, but this one is just a bit out of my league!
For sure, this needs to be addressed before I bury it with the shortline benchwork. So, a plumber has been contacted, I am awaiting a quote, and we will see how things go.
Most things are NOT easy on the Onondaga Cutoff!
Finally, Happy Easter to those that partake, and Happy Passover to the rest!
~RGDave
To complete the shortline benchwork, I need to build only about 8 linear feet of remaining subroadbed. We are CLOSE! It will connect the stair-tunnel, which is already in place, with the bridge for Skaneateles Creek, which is ready to go as well. However, it is anything but conventional. This will be a 90-degree, 20" radius turn that needs two 3-foot approaches, and the whole thing is built right along a stone foundation, over the wooden landing from the stairs, and beneath the electrical panel on the wall.
Further, the big turn will be in front of the domestic water supply and meter for my home. As I was measuring, I noticed some wet drips from the unions around the meter...

For sure, this needs to be addressed before I bury it with the shortline benchwork. So, a plumber has been contacted, I am awaiting a quote, and we will see how things go.
Most things are NOT easy on the Onondaga Cutoff!
Finally, Happy Easter to those that partake, and Happy Passover to the rest!
~RGDave
Monday, April 18, 2011
Cima Hill, and Afton Canyon

It's always a wonderful 'reset' when you can get to the desert for a while :-)
This and other prototype photos from my recent trip to California are viewable here:
http://rgdave.rrpicturearchives.net/archivethumbs.aspx?id=66652
I have other albums coming along, too; enjoy!
~RGDave
Monday, April 11, 2011
Euclid Yard - Benchwork Complete!
Hello, all! I have just returned from a week exploring two California railroad landmarks: Cajon Pass, and Tehachapi Pass. It was an amazing trip! Photos to follow!
As mentioned in the last post, there has been significant progress in short-line construction recently as well. The Minoa & Euclid Railway will terminate at Euclid Yard, and the benchwork for that yard and for most of the shortline's main route is all now in place.
First, Euclid Yard. This is across the aisle from Onondaga Yard on the Cutoff, which is on the left in this photograph. I made sure to leave plenty of space for operators to walk around each other here, about 40 inches, thanks to some recommendations from you all!
 The main route for the M&E will climb the grade in this photo up to the tunnel through the staircase, while the level piece will be an industry - Central Car Repair Shops - which will actually be right at my workbench, and will be a big customer of the M&E.
If you look below the surface of the yard in the photo above, you can see that this was a non-conventional set up. The issue is that the sewer main for my home is directly below the studs, necessitating some creative supports for the railroad. This began with setting a height for the yard, which dictated the length of studs I would need. Once cut, I used heavy through-bolts for the thinner joists, and lag bolts for bigger joists, both with washers to hang 2X4 studs from the floor joists above. Here is an installation of 1/4" lag bolts in one of my home's huge 10"x10" main beams.
 A special thanks to my wife, Kristen, for help positioning these studs - they are not easy to support before clamping and bolt installation. Those studs come down to about 3' off the floor, allowing me to use 2X3 longitudinal bracing to set the stud spacing, and more 2X3 diagonal bracing to support the horizontal cross-members. Gusset plates, cut down from scrap plywood, are used to connect the diagonal bracing and the cross-members.
 In all, it seems very solid to me, if unconventional! If needed, I can always add a few legs to the horizontal members closer to the aisle, but I hope to avoid that with this heavy bracing.
Once the main route of the M&E begins to climb out of Euclid yard, it works through a gentle s-curve on a 2.5% grade over the workbench area and up to the stairs, where it passes through a tunnel to stay along the foundation.
 At the top of this grade will be the start of a tunnel through the stairs. This will require a bit of creative carpentry, to allow trains to pass without getting stepped on. As you can see, the entire stairway shifts at this point, so this should work out well, but I will need to cover the track here to ensure rail traffic and foot traffic do not mix.
 All that remains is to connect this subroadbed with the construction on the front wall, only about 6 more feet of benchwork! However, it will be on a curve in front of the water supply line, which has a small leak from the meter. The water company will be looking at this during the week, and then it's time to connect everything together. Good times coming on the M&E and the Onondaga Cutoff!
As mentioned in the last post, there has been significant progress in short-line construction recently as well. The Minoa & Euclid Railway will terminate at Euclid Yard, and the benchwork for that yard and for most of the shortline's main route is all now in place.
First, Euclid Yard. This is across the aisle from Onondaga Yard on the Cutoff, which is on the left in this photograph. I made sure to leave plenty of space for operators to walk around each other here, about 40 inches, thanks to some recommendations from you all!

If you look below the surface of the yard in the photo above, you can see that this was a non-conventional set up. The issue is that the sewer main for my home is directly below the studs, necessitating some creative supports for the railroad. This began with setting a height for the yard, which dictated the length of studs I would need. Once cut, I used heavy through-bolts for the thinner joists, and lag bolts for bigger joists, both with washers to hang 2X4 studs from the floor joists above. Here is an installation of 1/4" lag bolts in one of my home's huge 10"x10" main beams.


Once the main route of the M&E begins to climb out of Euclid yard, it works through a gentle s-curve on a 2.5% grade over the workbench area and up to the stairs, where it passes through a tunnel to stay along the foundation.


Friday, April 1, 2011
April's Status
Shortline progress continues, with all major framing in place to support the far south end of the short line at Euclid Yard! This took some doing, as just before I was about to mount the footer beam to the concrete floor, I realized I was over the gravity sewer main for my house - not a wise spot to permanently place a full-height wall, and an even less wise spot to drill holes for masonry anchor bolts.
That could have been some bad news.
Having realized the dilemma, I consulted with my friend Rick, who suggested framing the area out with 2X4's through-bolted to the floor joists above, to create a hanging table. If I then tied together the studs with a horizontal girder and stringer arrangement, it should result in a sturdy table. He recommended adding legs, too, but instead I used diagonal bracing running from the middle of the table back down to the bottom of the hanging studs. The result is actually very stable, and so far it seems to be just what we need to support the table.
Also in progress is the newly-built through-truss kit for Skaneateles Creek. This is a nice, long through-truss built from a Walthers kit that will be painted and weathered for use on the short line. This will be one of the first scenes people see when they come down into the basement, so I want it to be impressive - and a big bridge is always impressive!
The last benchwork needed is the odd arrangement required to pass through the basement stairway in a tunnel, and make a 20-inch radius turn along the foundation to connect both halves of the shortline benchwork. This will require some creativity - stay tuned!
Photos to come soon!
Tuesday, March 22, 2011
Shortline Progress
Work is well underway now on the shortline component of the layout. It will be the M&E Railway, which on my layout is the Minoa & Euclid, though the M&E in real life is the Morristown & Erie, a local shortline here in New Jersey that is largely Alco-powered and is a model short line in their operation and classy paint job.
The M&E leaves the main line at CP282 and immediately climbs a steep 4.5% grade on a horseshoe curve up to a summit (required due to the oil tank location in the basement). The line then descends on a 2.5% grade to a big through-truss bridge over Skaneateles Creek. From that point, the line will climb again up a 1% grade along the wall and pass through a tunnel that allows the tracks to continue through the basement steps. The far portal of the tunnel will be over the workbench, and the tracks come down a 1% grade into Euclid Yard at the end of the line.
Here's a view of the overall progress so far. CP282 is to the right, with the short line diverging left and climbing the immediate hill across the oil tank and back towards the camera:

With grades like this, operations on the shortline will seem more appropriate with shorter trains and classic power. The big C424, paired with either an RS-1 or GP7, will be a regular for the run from Euclid Yard down to interchange with Conrail, needed to move the 8-10 car train back up the 4.5% grade to the summit. Smaller locomotives will call Euclid Yard home, and be used to switch the yard and the customers there: a big brewery, and a car repair shop (the workbench).
So far, the benchwork is in place for about half the length of the line, from CP282 to Skaneateles Creek. The final major benchwork construction is required to frame out the wall that will support Euclid Yard. I laid some of the track from CP282 south, and now need to construct the bridge in order to finish the route. This will be a very narrow section of railroad: a total depth, front-to-back, of about 10 inches. Backdrop and scenery will be key here in 'selling' the look to a viewer or operator.
Back in the 1990's, I kitbashed an Atlas C424 carbody and chassis to model Morristown & Erie 19. I put a decoder in the locomotive over the weekend. Here it is at Onondaga Yard:

Since 19 will be a mainstay for powering my shortline, I needed to have a reason the unit would be in central New York.
This is where the 'modeler's liscense' comes in: my story is that the fictional shortline was purchased by NJ-based Morristown & Erie, and is using the 19 under agreement with the 'real' M&E. The line will have other power as well, but lettered and painted for the Minoa & Euclid, not unlike the Maine Eastern, which is a prototype contract operation by Morristown & Erie.
Finally, an action shot of train SEBU (Selkirk to Buffalo) with a wild lashup, including M&E 19, as it comes west through the interlocking at CP277:

The shortline, and the subsequent interchange, will be a key to the long-term fun of operating the Onondaga Cutoff!
Saturday, March 12, 2011
Shortline Construction
Thanks to a few hours work today with Rick, the shortline progress has begun! The first of two walls that will support the future right-of-way is now in place:
 Everything ended up plumb, despite my out-of-level home and basement. Having another person to help (actually Rick really guided this work session today, and so I helped :-) is really an asset and part of the fun of model railroading. Rick is in the process of building a large layout of his own, and will be going with NCE DCC, just as I did. After we worked, I gave him a run-down of the system and he operated a few trains, the first of many times to come when we'll be operating together.
Here, the WAON-10 works the west end of the yard with U23B 2795 and an ex-NYC caboose:
 I put a variety of photos and wall hangings on the layout recently to get them out of the way of construction, but I think I may leave them for now - it is a totally different effect to have them blocking the view of the railroad on the far side. Eventually, that will all be backdrop, but for now it's nice to have anything to break up the scene.
A few mintues later, SESL (Selkirk, NY to Saint Louis, MO) worked past the local on Track 1, with SD40-2 6524, SD50 6789, and SD40-2 6495. This is becoming a favorite spot of mine to take photos of the railroad - this view is just about how it appears when standing next to the layout, as the top level of the layout is just below eye level:

Tomorrow, I will continue shortline progress. More to come!

Here, the WAON-10 works the west end of the yard with U23B 2795 and an ex-NYC caboose:

A few mintues later, SESL (Selkirk, NY to Saint Louis, MO) worked past the local on Track 1, with SD40-2 6524, SD50 6789, and SD40-2 6495. This is becoming a favorite spot of mine to take photos of the railroad - this view is just about how it appears when standing next to the layout, as the top level of the layout is just below eye level:

Tomorrow, I will continue shortline progress. More to come!
Tuesday, March 8, 2011
Wreck Repairs
Some mishaps on a layout are unavoidable. However, some are worse than others, and over the weekend I had my worst wreck to date.
I am beginning to experiment with new benchwork to support scenery, and that includes scenery that will be above the staging level on the main line. I have clamped 1X2 lumber to the existing benchwork in order to measure heights and get a visual generalization of how things may come together. Everything was clear, and seemed to work well.
At the end of some operating later that evening, however, I leaned a bit too hard on a clamped stringer, and the clamp shifted lower, allowing the stringer to block the forward progress of a double-stacked containter on TV14. With 4 units up front and 12 cars ahead of the contact point, about 9 cars immediately 'string-lined' the curve. Two of those hit one of my guard rails, but the rest? Yup. They hit the floor.
Thankfully, no locomotives left the rails, and the cars that took the fall were older well cars, but they piled up and sustained damage that made the wreck look pretty real! Containers at odd angles, shattered truck frames, wheelsets everywhere, cars at different angles on the floor.
After 3 hours of work, I was able to repair all the damaged cars, and last night, all of them returned to service. An upside to this was that I meant to weather all those cars with my airbrush anyway, and this was a perfect opportunity. A few photos of those cars will come soon.
Lesson learned: any clamps that will be in place long-term should be TIGHT! And, don't adjust or lean on anything clamped when trains are close by. I learn slowly, but I do learn :-)
Exciting news is that I have procured all the lumber necessary to frame out the last two walls in the basement for the layout, which will enable construction of the short line right-of-way to get started. This coming weekend, Rick and Jack will both be lending a hand to get the framing in place. I'll get photos of the progress up next week!
Monday, February 28, 2011
As March Approches...
...the number of DCC-equipped locomotives on the Onondaga Cutoff increases! I am adding decoders and headlights as I go along, and it's refreshing to begin to see the layout be increasingly populated by locomotives I built years, and in some cases decades, ago!
As a side note, the vast majority of my equipment modeling and weathering is done at my workbench, seen here after a much-needed spruce up that I did last week:
 The layout is to the right in this photo, Onondaga Yard just across the aisle. A key note here are the supplies for another of my hobbies on the shelf: good beer. It's also a simple pleasure to open one of those and enjoy it when running a few trains. :-)
Decoder installation is a major project. One thing I have learned to NOT trust are the manufacturer-installed DCC "Quick Plugs", the 8-pin socket on the factory boards in most Kato, Atlas, and modern Athearn locomotives. Recently, I purchased 4 Northcoast Engineering (NCE) 'DASR' decoders, and 4 NCE D16SR decoders. The DASR's are replacement boards for the manufacturer-supplied PC boards - they are intended to replace the supplied board. The D16SR's are 'plug & play' and plug into the existing board, replacing a 'jumper' in the socket as supplied by the manufacturer.
In all, only one D16 worked. The other three burned right up. Every DASR worked as advertised. While the DASR decoders are a few dollars more, I got tired of the $17 of D16 going up in smoke - so, all my PC-equipped locomotives will receive DASR decoders.
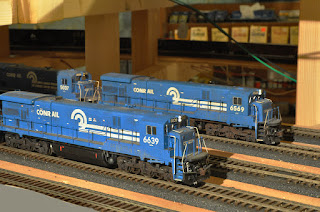
On another note: anyone familiar with Conrail road freights on the Albany Division in 1994 (including the Chicago Line, of course, but also the Boston Line, River Line, and associated mains) remembers the dominance of 'Dash-7' General Electric locomotives on those lines. Long ago, I built two big 6-axle Dash-7's: C30-7A #6569, and C36-7 #6639. Both were kitbashed from Railpower shells, and both are built upon Athearn 'blue box' chassis. Now, both are DCC-equipped, with headlights, and are working well for the Onondaga Cutoff.
Here they appear, side by side, in separate multi-unit consists on separate trains in the staging yard:
As a side note, the vast majority of my equipment modeling and weathering is done at my workbench, seen here after a much-needed spruce up that I did last week:

Decoder installation is a major project. One thing I have learned to NOT trust are the manufacturer-installed DCC "Quick Plugs", the 8-pin socket on the factory boards in most Kato, Atlas, and modern Athearn locomotives. Recently, I purchased 4 Northcoast Engineering (NCE) 'DASR' decoders, and 4 NCE D16SR decoders. The DASR's are replacement boards for the manufacturer-supplied PC boards - they are intended to replace the supplied board. The D16SR's are 'plug & play' and plug into the existing board, replacing a 'jumper' in the socket as supplied by the manufacturer.
In all, only one D16 worked. The other three burned right up. Every DASR worked as advertised. While the DASR decoders are a few dollars more, I got tired of the $17 of D16 going up in smoke - so, all my PC-equipped locomotives will receive DASR decoders.
On another note: anyone familiar with Conrail road freights on the Albany Division in 1994 (including the Chicago Line, of course, but also the Boston Line, River Line, and associated mains) remembers the dominance of 'Dash-7' General Electric locomotives on those lines. Long ago, I built two big 6-axle Dash-7's: C30-7A #6569, and C36-7 #6639. Both were kitbashed from Railpower shells, and both are built upon Athearn 'blue box' chassis. Now, both are DCC-equipped, with headlights, and are working well for the Onondaga Cutoff.
Here they appear, side by side, in separate multi-unit consists on separate trains in the staging yard:

Enjoy!
Friday, February 25, 2011
The Prototype Calls
Usually when I'm slow in blog entries on the model railroad, it's because I'm off doing something with the prototype. In this case, I spent time on three separate trips and got some nice results. Here's results from two of the three trips as proof:
 Bessemer & Lake Erie #901 North, Carter, PA 1/29/2011
 Utah Railway swing help returning from a push to Solider Summit; Castle Gate, UT 2/12/2011
More of my prototype photography is available at http://rgdave.rrpicturearchives.net/ if you are so inclined!
More model railroading to come soon. Besides the trips, I did get a chance this week to give the work bench a much-needed cleaning. Also coming soon is learning the hard way about the perils of NMRA-plug decoders. I did install a new type of decoder successfully, as well.
Enjoy the weekend!
Subscribe to:
Posts (Atom)