Friday, December 15, 2017

Publication - of the Onondaga Cutoff!

I have been working for some time on a major announcement regarding the Onondaga Cutoff - and today, I can say with excitement that a full-length article on the layout will be published in Model Railroad Planning 2018!


Model Railroad Planning is a special edition, produced by the publisher of Model Railroader, once each year.  It focuses on layout planning and construction, and that's exactly the angle that is taken with my article, which will be published in early January.


I am so grateful for the opportunity, and for the incredible assistance offered by many through the years.  I am hopeful that this is a start to a series of in-depth articles I can create about modeling and layout construction, and that makes me even more thankful for the assistance and guidance.

Best wishes for a happy and healthy New Year!

~RGDave

Wednesday, December 6, 2017

Reminders of the Past

It has been discussed before how model railroads function as a sort of time machine for us that are interested in history or in operations.   While the last few installments have left us with a shiny new undergrade bridge, one way we can emphasize history is to use weathering to fade, but not erase, elements of the past in our modeling.  Conrail, for example, ran its trains almost entirely on routes built by its predecessors.  On the Onondaga Cutoff, the predecessor is the New York Central.  


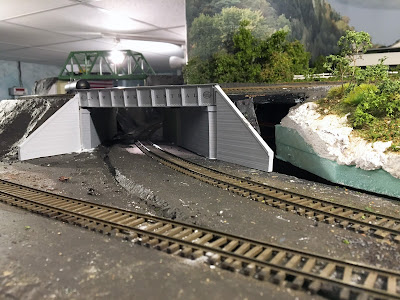
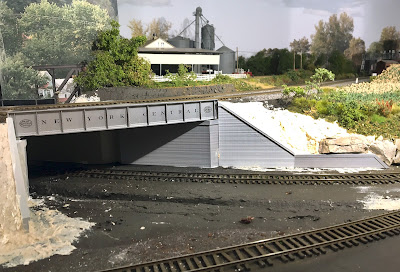
Here, I have applied a series of thinned black with an airbrush to the bright silver girder.  I then moved to add layers with pastel chalk powder, including black and also rust on the bottom flange.  Abutments were painted to represent old, weathered concrete, and then were dusted themselves with pastel chalks.  What a difference!   The old lettering and logos peak through just enough that an observer only sees the lettering after staring for a few minutes.


Here's an aerial view of the whole scene, now with some cinders and ballast along the Cazenovia Industrial Track.   Soon I can feather in the remaining ground cover, a few trees, and we're there!

Sadly, the passage of time also can bring some darker news, and I have some today in that my father's brother, my Uncle Paul, passed away yesterday after an accident at home.  He lived a full life and despite living in Australia, he made several recent trips to the US to spend time with us.  My children knew him, and my heart goes out to his wife and family in Australia.   In the end my father and Paul both passed away doing things they loved: being independent and strong men.  They both passed on their own terms, and both will be missed.  Here is an image, courtesy of Lou Capwell, of the last time each of them visited the Onondaga Cutoff.


This is a good time of the year for reflection, for consideration and quiet appreciation.   Here's to the memories of Paul and Peter Abeles, two brothers and good men for which I am thankful.

~RGDave


Tuesday, November 21, 2017

November Interchange

Last year, we were invited to have the Onondaga Cutoff be part of an annual round-robin series of operating sessions where a group of layouts in New Jersey are open for a group of modelers and operators from Virginia and Maryland to visit and have a guest operating session.   It was a pleasure to meet so many other modelers of note and to host such a great group of operators! 

This year, we were invited to join the same group on their turf for a weekend of operations and open houses.  I was able to operate on two layouts that have long been inspirations to me:  Mat Thompson's Oregon Coast, and Doug Kirkpatrick's Virginian & Western.  Both were wonderful hosts, and both layouts are nearly complete with robust operations and amazing scenery.  So, I asked permission from the layout owners to share a few of my photos of their spectacular work here.

Friday I was at the Oregon Coast (another 'OC'!) hosted by Mat and Victoria Thompson:

 Jack & Tom hard at work at Hoyt Street Yard, Portland Oregon 

 Jerry working hard at the big Swift Meat Plant outside of Hoyt Street Yard

 Fabulous scenery on Mat's Oregon Coast - the Victoria local passing an abandoned logging camp.

 Friday evening social at Mat's after the session.  Great camaraderie!

 Saturday morning we find ourselves at Doug Kirkpatrick's incredible Virginian & Western, inspired by the Norfolk & Western in VA.  I'm quite partial to the signals, of course, but the hand-laid track is amazing and the scenery very convincing.

 The tail end of my freight train, 99, working at Jamestown Yard.  All cabooses are lit.  The depth of these scenes and the flowing trackwork are a pleasure to see.


Finally, another layout that does night lighting!  While Doug uses blue lights, the effect is wonderful with all the lit buildings and equipment he runs.  Here the switcher at Cincinnati waits in the clear while my train 96 rolls past.  


An overview of the station and mainline at Loraine, lit up after sunset. 


 Signals lit up for east and westbounds to meet at Falls Church, home to a local even overnight.

This was a weekend that I had looked forward to for a full year, and even given high expectations, the weekend exceeded them.  The layouts were wonderful, the operations satisfying and interesting, and the camaraderie reminded me there are still a lot of good people out there.  In short, this is one of the things that makes this hobby so special to us - it's all just good fun.

Happy Thanksgiving to you and your family!  

~RGDave
Monday, November 13, 2017

Filling in the Blanks

Progress comes in waves.  Scenery on a model railroad, much like other projects that are largely subjective, will linger for months or even years - and then once you begin moving on one part, you move to finish that and the next part falls in line.   There is a momentum to scenery, one good thing helps lead to the next.

With the embankment from the last entry now cured, I gave it an overcoat of paint to blend it in.  Note how the underpass for the Cazenovia Industrial, to the far left, virtually disappears now.  Once this is covered with foliage and trees it is going to blend in perfectly.


A closer view of the bridge, its abutments and wingwalls, and surrounding embankments:


Rolling with that momentum, it was time now to finalize the last piece of the embankment in this area of the layout, around undergrade bridge 279.17.  This is a tricky area with geometry, with a heavily skewed angle due to the geometry of the Cazenovia Industrial Track below the main line.

A first image shows the abutments and wing walls with a test fit.  It required two abutments one each side of the underpass, because when a bridge is skewed, the walls beneath get longer if the width above is constant.  This one is so skewed - approximately 50 degrees from square - that two abutments below, side by side, worked out well.   Those were glued in place with latex adhesive caulk, and allowed to cure overnight.   Then I set the wingwalls in place to see how those would fit.


The next step was to mix a batch of sculptamold and fill in the areas behind the wingwall, taking care to match the geometry of the landforms beyond.  I began with crumpled paper towels as a backer for the plaster.  The wingwalls are just set against the wet sculptamold, and carefully adjusted so that when the plaster cures, the whole assembly is solid.  Here's an overview once the contours were finished and the walls set in their permanent places:


And, finally, a tighter view showing the angle under the railroad.  The vision here is that the entire cut beyond will be heavily canopied with vegetation and tree growth, hiding the angle and the route of the track once it rounds the curve as seen here:


Plenty of paint and weathering are coming here soon, and once again the momentum of the scenery process will lead to regular progress into the wintertime.   My goal is to have both bridges fully weathered and mounted in place, and the surrounding area seen here completely covered with foliage before the end of the winter.  As always, I will keep you posted!

~RGDave

Tuesday, November 7, 2017

The Growth of an Embankment

Over the last several weeks, the embankment and bridge abutments at overhead bridge 279.89 have come together well, and as of last night are now at their final land form after being coated with a last layer of Sculptamold.  

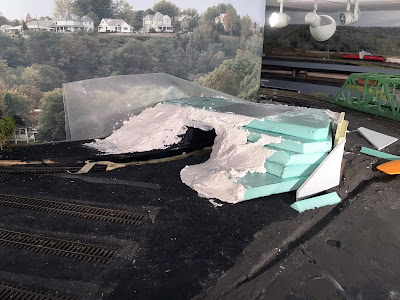
Here are a few photos showing the foam stacks, providing a gentle sloped approach to the bridge that will support the road surface, and the duckunder for the Cazenovia Industrial Track visible to the left.  This is a tough part of the layout to scenic, with multiple viewing angles and several different elements that come together here.  How to make those not distract from one another?  We need the illusion that the branch is on a different alignment here.  It took some time over months and collaboration with Rich W. and Jason to make a decision.  

The goal with the duckunder is to make that particular aspect of the embankment disappear - there isn't room to build another bridge there without having it look forced, and it would distract from the main scene.  We will tree in around that area so that it is invisible to the viewer.


Once the foam was set and glued down using latex adhesive caulk, it was time to do the Sculptamold surface.  I installed some wax paper to protect the backdrops, and some tape to protect the tracks, and away we went.

As is the case with so much of the scenery process, the visual difference is stark once we complete different steps along the way.  Here are a few views of the completed plasterwork as it cures.   


Of course, it will look even better with paint, and much better still with scenery.  But these views help you see the direction we are going, and the view block is very effective even now.  The entrance for the Cazenovia to duck under will almost disappear with just the painting process as you can see here, and once the trees are planted around that area, I think trains coming down the branch will disappear and reappear with no distraction for the main scene.  

Progress like this is very satisfying and sets the stage for finishing the scenery here over the course of the next few months.  This will be a different view entirely before winter is through!

~RGDave


Monday, October 30, 2017

Over & Under

Now that the dairy farm scene is largely completed, I am working on the two bridges immediately east of the farm scene - an undergrade bridge, and and overhead bridge, in Conrail parlance.  Bridges on different railroads are noted in different ways.  Some railroads use a 'bridge number' where the structure is numbered beginning with '1' as the first structure, then 2, 3, and so on.

Conrail used the milepost to create a unique bridge number, down to the hundredth of a mile, numbered from a survey identifying the easternmost point of the structure.   I have numbered mine within milepost 279, which is to say west of 279 but east of 280.   The undergrade bridge is 279.17:  two hundred seventy-nine point one-seven miles from the bumper post at Grand Central Terminal in New York City, Milepost 0.0 on the Water Level Route.  This bridge is based on a prototype in Syracuse (and another in Little Falls, NY) on which one could still see the NYC markings beneath the rust and grime.  A heavy dose of weathering is coming soon to this structure!


The girders rest on poured concrete abutments, modeled from the stock Walthers kids, and cut to fit.  Again these are just placed in for now, a test fit of sorts, before full weathering and assembly.  Note too that there will be a second abutment placed behind the one visible to suggest the right of way that used to carry more than two (three) tracks - since the East Lead of Onondaga Yard is present here too.  The drainage ditch is in place, and once the bridge is painted and weathered, it will be glued in place too, opening the door for finishing this scene.


West of 279.17 is overhead bridge 279.89, my ongoing kitbash of a highway bridge from the stock Walthers truss.   You can see here now that it has its railing installed for the sidewalk, the railing being the stock Atlas 'hairpin fence' made for intertrack fence applications at train stations.  For me it captures that perfect 1930's vintage look for an old steel bridge railing.  There will, of course, be several photographers foaming appropriately over the Conrail (and NYS&W, Amtrak, etc) action.

Current efforts are focused on building up the embankment behind that bridge, and finishing it to the same standard as the surrounding territory.   Foliage will come next and then the road surface, after which the whole scene can be detailed and ballasted, a goal of mine by the end of this winter.

Little by little!  Each day counts with progress over and under the railroad as well as along it.  Happy Halloween to you and to all the trick-or-treaters out there!

~RGDave


Sunday, October 15, 2017

Dairy Farmin' on the Onondaga Cutoff

Over the last few months, I have been working with a model railroad friend of mine to fill a long-vacant scene with a sight common in Central New York – a dairy farm operation.   The Onondaga Cutoff as you all know by now is a fictional bypass through Onondaga County around the City of Syracuse, NY, and woven throughout the actual Onondaga County are a number of large family dairy operations.  As some of the longest-standing commercial property in the area, I felt that a dairy farm would help tie the fictional route to the region.  Thanks to Jason's talent and time, the results are exciting:


While corn fields and a farm could be many locations, the New York Central standard signal bridge, GRS 'SA' signal heads, NYC 'tombstone' milepost, and the double track mainline on a right of way that used to accommodate more than that all say Upstate New York.

Once Jason and I had started to talk about what scenes I was planning for different spots, he began to research scenes and I started to figure out the details of what would fall where.

Jason and I measured and re-measured the areas, and he did the lion’s share of the work offsite at his workshop.  He returned with almost-finished scenes and we set them in place:


 ...and then I worked to attach them permanently and blend them into the surrounding layout.


While the farm is the focal point of the scene, an irregularly shaped area in front of the tracks was a perfect place to install a cornfield and the associated details.  Since it would also be in front of the tracks, we needed to double check the elevation and angle, so we did a test fit.


Once we confirmed that, I wired the lighting in the barns, finished the ceiling, ballasted the main line track, and worked to ready the substructure for the new addition.  


Once Jason arrived with the field, we set it in place, and with just a bit of modification it was a perfect fit.  The difference in this scene is truly incredible now.


Once the scenes were both in their final spots, I worked to ballast both the main line and the Cazenovia Industrial Track in the foreground, and to add the farmer's private grade crossing between the farm buildings and the cornfield.  


The small crossing is a perfect compliment to the scene, and is shown here while drying:


It makes for a perfect foreground, and when combined with the NYC details and Conrail operations, it’s a very plausible representation of mainline railroading in Central New York.

This is another step in the enjoyable process of including the community in not only operation but also design and construction of the Onondaga Cutoff.  Each of the aspects of this model railroad has been improved by allowing others to be involved, leading to a layout far greater than what I would be able to have accomplished myself.  And then, each month, we all get to enjoy the fruits of the labor of everyone when the railroad comes alive for a 12-hour slice of 1994.

And, of course, we're headed into the winter 'modeling season' which means more progress still.  Also coming soon is an open house on November 4, in conjunction with the 2017 Garden State Division NMRA Railroad Prototype Meet in Clark, NJ.  Details are available at  http://gsrpm.org/

Maybe we will see you during the open house!

~RGDave

Friday, September 22, 2017

Landforms and a Scene Break

Building on the recent progress with the new bridge, I proceeded to locate the structure and its abutments on the curve east of CP 280, which allowed me to install a modified piece of fascia to accommodate the embankment.  This in turn allowed me to finalize the edge of this part of the layout, and proceed with installation of the basic landform.

 First the new fascia in place, with the rise cut in to cover the end of the embankment:

Here is the webbing after installation, using hot glue to tie it all together (notice that nice green paint on the new bridge, too!):

Now we see the webbing covered with plaster-infused gauze.


It is still amazing after the years of staring at this scene without the landform how quickly it changes, and how much better it looks!  Suddenly, it is much easier to see how the scene will come together.  With some Sculptamold and then a base coat of paint and static grass with some foliage, this area will suddenly come to life.

Little by little, and sometimes, more!

~RGDave

Friday, September 8, 2017

Quick Look Back

Over time I have come to realize how much this blog is a documentary of progress on the Onondaga Cutoff, and it is interesting to see on certain dates how much has changed, and what is still the same.

In that light, here's a photo seven years ago today of trackwork progress at CP 282:


Mainline track at that point was in place, but the yard track and turnouts were not yet finalized.  This seems a lifetime ago!  While this trackwork is still in place and obviously visible, the view is totally different with scenery, signals, and now with the M&E in the background which in September 2010 was not even yet constructed.

Several people have requested a comparison shot - here it is!  This is the same location today, from a slightly different angle since a big 4-track signal bridge stands exactly where the original image was taken from:


On occasion it is important to reflect on change, and in this case, on progress.  I hope that in the next seven years the layout can come as far as it did in the previous seven years!

~RGDave

Monday, August 21, 2017

On Overhead Bridges

The next major installation of scenery will be installed just east from CP 280, an area where the mainline curves around the big peninsula on the Onondaga Cutoff.  Seeing that there are no locations on the Chicago Line where the railroad does a 180-degree turn within one line of sight, it is visually important to break this scene up.

I began by assembling pieces of several kits and setting them in place to get a feel.


We have the Rix Products concrete viaduct piers in the foreground, and the Walthers Double Track through truss rough assembly behind.  This is a big visual change and so it's important to mock up the general idea before deciding on the exact approach and location.  I decided I'd like to handle this with an overhead highway bridge, evocative of the big through-truss spans that were common across Central New York through the 20th century  - including one that stood at the west end of Dewitt Yard in Syracuse, NY.

Such roadway bridges are not as common as I expected in HO scale, short of custom brass models - and I cannot justify spending hundreds and hundreds on a bridge that won't carry trains.  I decided to use a Walthers through-truss kit, and kitbash it to better resemble a highway bridge.  (The concrete bridge seen above will be located further east in the town of Fayetteville.)

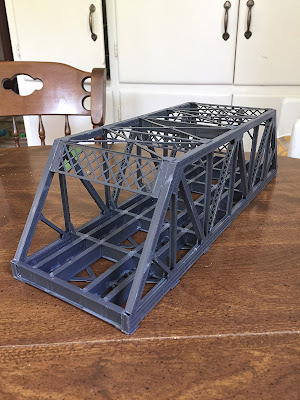
The stock Walthers truss is a kit for a bridge to carry railroad tracks.  While similar, highway truss bridges tend to have bridge members that are somewhat smaller in size, since they carry less weight.  To capture that feel, I used the trusses and floor system from the Walthers kit but replaced most of the bracing with lighter-gauge lattice from Micro-Engineering city viaduct kits.  Some splicing was required.  Those pieces were allowed to cure overnight.


It's summertime, and that means lots of time with the kids.  I brought the kit and my tools up from the basement and worked on the kitbash while they played.  You can see the main kit on the right above, and the ME kit to the left, with a happy 6-month-old Pete behind in his bouncer (which he loves).


Later, as I enjoyed coffee and the kids ate breakfast, I brought the project to the kitchen table and continued my work.  I inserted the assembled lattice kitbashes, and glued the trusses to the floor system all at once while the kids asked questions.  Susie helped (under a watchful eye) with some of the assembly.


Here's the current status of the bridge, which will get Micro Engineering bearings and DOT green paint and weathering before a concrete-and-asphalt deck.   You can see the lacy horizontal webbing, which is much more evocative of a highway span than of a railroad span.  I also used the stock ME bracing lattice on several of the vertical members, helping too do differentiate this bridge from the stock kit.

Given its prominent location on the main line, this will be the centerpiece of the next scene.  It's fun to share some of the assembly process with the kids, and to see this scene get started.  We are setting up for a fun autumn and winter of progress on the Onondaga Cutoff!

~RGDave

P.S. - enjoy the rare total eclipse of the sun today, which will be going on when this blog entry is posted!


Monday, July 31, 2017

More Frickin' Weeds

On the Onondaga Cutoff, we strive to replicate real-world situations, and I am focused between operating sessions on adding scenery or elements that compliment that focus.  It's ironic that one of the great goals of prototype model railroading is to model those things that in 'real life' we try hard to minimize.  Weathering, industrial decay, litter, and, of course, weeds.


Now that some of the scenery behind CP 280 is set, it was finally time to scenic the narrow stretch of real estate adjacent to the interlocking.  Seen here to the left, maintenance crews have carved an access path through the vegetation but Mother Nature always finds a way.  Weeds crop up here, even some nice wildflowers, but weeds nonetheless.

In modeling and in life, sometimes the weeds are a welcome sign of reality.  Best wishes here at midsummer from the Onondaga Cutoff!

~RGDave

Monday, July 24, 2017

Ballasting the Engine Yard

As we have discussed over the years, I feel that scenery is best accomplished in layers.  While the Onondaga Cutoff operation continues, scenery can grow in organically, spreading across the layout in layers that allow your mind's eye to grow along with the scenery itself.   Industrial scenes, just like rural scenes, require some vision of where we want to get to, but that vision changes once the base layer is in.  


For Onondaga Engine Terminal (ONET), I began by adding a 'concrete' apron across the front of the engine house. The kit was built and installed early in the process since the rails run through the drop-floor casting, and so a hole was cut in the subroadbed to fit the enginehouse.  I refereed to prototype photos of Conrail engine houses at Dewitt and Selkirk for guidance on the dimensions of the concrete slabs and how the track was located through the troughs. Composite hardboard made a good choice for the appearance of weathered concrete.


Dark gray grout was then spread across the yard and engine house trackage, with a hefty addition of 'Black Cinders' from Arizona Rock & Mineral.  All of that was soaked with isopropl alcohol and diluted matte medium, and allowed to dry for 24 hours.


Weathering is a critical aspect of any prototype layout, and track is no exception.  Engine house tracks are gritty, greasy, oily, and grimy, with oil- and grease-soaked locomotive sand and ballast. Even when well-maintained, these tracks are filthy!  Arizona Rock & Mineral sells an 'Asphalt Paving Powder' that is a dead ringer for oil-soaked sand when piled about the center of the track, and the same firm's 'Gray Base Powder' is a nice stand-in for fresh locomotive sand that has been spilled here and there, adding nice highlights to the dark grit of the base.


After the engine yard was curing, it was time to tackle the maintenance yard, used to store maintenance equipment, snow-removal plows and spreaders, and the fuel delivery track.  Here, I again used dark gray grout and black cinders, and added some 'Yard Mix' from Arizona Rock & Mineral as well to suggest track less soaked with oil.  Some fresher gray ballast was added where the cabooses are stored as this would be a spot with more personnel about.


Once the area cured for 24 hours, I added some miscellaneous weeds for contrast, and then lined up all the MOW equipment once again.


What a difference some ballast and ground cover makes!  While more subtle than some other recent scenery additions, it's satisfying to get this scene to a more final look.   This sets up the stage for progress further east where some major scenery installations are coming soon.

As the hot, humid summer days pass once again, I am thankful for the time I can spend in the cool basement at the end of each day making some progress and sharing it with all of you.  Enjoy the summer and check back soon for more updates!

~RGDave