Showing posts with label Euclid Yard. Show all posts

Tuesday, November 26, 2019

Rapido B36-7: Looking Great

Just a few days ago, a nice box arrived in my mail with three beautiful Rapido boxes inside.  A fourth is coming soon:  the arrival of the long-awaited, much anticipated B36-7, a staple on any Conrail route with intermodal trains in the 1980's and 1990's, and one of the critical models for operations on the Onondaga Cutoff.

Before traveling for a few days, I had time to unbox one of them, Conrail #5054, one of the neat engines that remained in original paint until the end of the 1990's.  Here we go:


This is an absolutely incredible model to see firsthand.  The color is perfect to my eye.  The overall look captures that husky-yet-soft appearance, and the dimensions I could verify check out.  The Conrail-specific stuff is amazing - cab signal box, marker lights, ditch light placement, battery box doors, horn placement, all perfect.

The model was reported by Rapido to come with too many snubbers from the factory, and indeed that was the case with this one.   A gentle but firm twist with a hobby knife for a few seconds and they popped off.  Rapido on one of their recent videos also said they would offer replacements if you aren't satisfied.  The photo above is after their removal.


I programmed the address to 5054, and started to test the lights.  Ditch lights are installed on this one, and they and the headlight look great.  Nice and bright, LED but 'day glo' or whatever these are called these days.


Next, we turn on the marker lights, which glow beautifully red just like the prototype.  Conrail did not use marker lights like other railroads by this date, and so elected to use lights that could be off or lit red only.  Rapido captured the look perfectly!

Sounds are the best I've heard from the factory, crisp and chuggy like the real GE's.  Amazing.  Operation is smooth and steady.  

My only complaint besides the obvious issue of the extra snubbers would be the programming of the decoder; the lights should all be controlled independently of direction.  Instead, the markers are lit on the trailing end only, and the head and ditch lights on the leading end only.  But, I can change these with the right CV's and will do so once I hear back from Locsound.

More to come as the others get unboxed and weathered up; what a great step forward for Conrail modelers!

Finally for tonight - my best wishes to you all for a happy and healthy Thanksgiving.  I believe we have a lot to be thankful for here and am looking forward to the future!

~RGDave
Thursday, November 21, 2019

Mmmmmm...Beer

After a few late nights and some help from my son Teddy, we have reached the wonderful 'finished but not complete' stage of things at Doelger Brewery!   The last few episodes discuss the process so I won't dwell long on it here.  With the glue cured and the scenery in place I added a few more tufts of weeds as well as some extra grit and the place is off and running.


Here's a view of the Barley Track, where inbound dried grains arrive in covered hoppers and are unloaded into the grain silos before roasting into malt.  Once malted they are stored until needed for the brewing process.


The metal 'sarcophagus' protects workers and the product from harsh Central New York winters.  Next is the brew house, which boils water and cascades it over the malted barley and oats to extract the flavors and sugars from the grain, which are in turn cooled and put in fermentation tanks with yeast.  Yeast eats the sugar and creates alcohol and carbon dioxide.


I added more lighting and a detailed interior to the structures so at night they would appear to be maintained and in use.


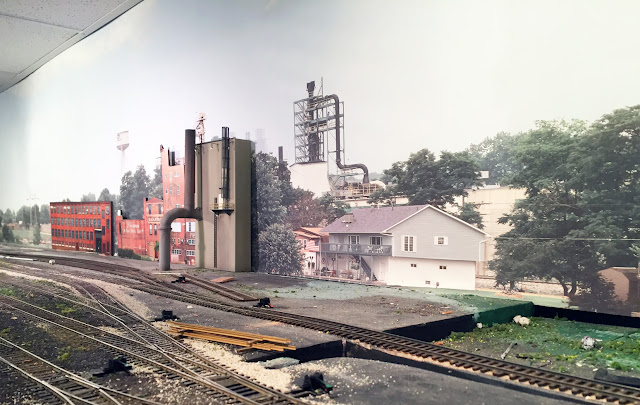
Finalizing the brewery trackwork allowed me after 8 years (!) to finish the scenery around Euclid Yard, and detail out the track and roads.  The scene came together well!

The timing worked well too to now give me a week or two to make some running repairs on cars that have been waiting for time, just ahead of the arrival of the magnificent Rapido B36-7's later this month.  One of the great pleasures of this hobby is that we can swing from the open, creative process of scenery to the linear, mechanical process of rolling stock maintenance.  

I will get some early photos of the B36-7's up here.  2019 is really turning into quite a year and we have a lot to be thankful for heading into the holidays!

~RGDave

Friday, September 27, 2019

On Temperance, and Permanence

Model railroading is a curious hobby of fascination and vision, and one that involves an interpretation of time and purpose.  While the trains take center stage, it is their movement that sets this hobby apart from the majority of other modelmaking hobbies, and the operation of these models in concert with each other and with a plan of some sort that brings life to it.

Temporary structures 'place hold' on a layout so as to get operations started, and give crews some visual cue of why the cars they are moving are placed there.  Such has been the case with Doelger Brewing on my Minoa & Euclid. Here's an overview of the temporary structures:


These are pieces of different kits I'd had from other parts of the layout, and several building flats that were in boxes people had donated to me over the years.  Cobbled together they make a scene look industrial, and with a sign or two that is all that was required to deliver the visual clues I was looking for.

Author Tony Koester has reflected in his writings over the years on the sense of purpose in operations, giving the railroad a sense of time and place in the greater transportation network that makes railroading in general so compelling.  Tony has made the argument that temporary structures pending the permanent models add a great deal to operations, and I agree.  

So, as the brewery continues to be part of the operation I have finally begun construction of the 'permanent' buildings for the industry.  These are from the Heljan kit for the brewery, to which I will add some modern structures and additions.   First step was the brick mortar, which was applied by painting all the brick sheets with acrylic paint in a mortar color, and then wiping the brick faces clean.


Once dry, window frames and doors are installed.  Window glass will come later, once weathering is completed.  I like how the paint is uneven, suggesting bricks laid in different courses by different masons.  The windows 'pop' with the drab brick around them.   Finishing details will include painting random bricks different shades, and I think it will be convincing. 

Since the structures will be lit, I sprayed the interior side of all walls with a dark gray color so as to prevent light leaks, and used magnetic clamps to hold the glued seams square while they cured.


Testors plastic cement worked very well here so far, and with the clamps I am getting nice tight joints that are so far lightproof.  I will use shadowboxes inside the structures so that certain windows are lit and others dark at night.


For the interiors, I am also planning to install a brewhouse, so that you can see through the large windows into the tanks and kettles for the brewing process.  I think that will be especially striking at night.

The architecture part of model railroading is one of many subject areas, and each offer areas to learn and explore.  More to come as this process continues!

~RGDave

Tuesday, March 27, 2018

From Stand-In to Actual

Since the Onondaga Cutoff was designed for operations, it was critical to the construction effort to have operating sessions sooner than later.  In addition to having fun, the sessions can teach us about what needs to be improved about the track and capacity of the railroad.  Changes and upgrades can be made to the track and infrastructure much more easily before scenery is completed.

Therefore, I used a variety of temporary structures early on.  These were important to give operators a feel for what would be there eventually, and provided cues for fun operations at the same time.  One of those was the enginehouse on the M&E.  This was a structure I'd had since about 1985 on my first layout, and it served its time well as a stand-in on the OC.  Now it was time to upgrade.


I choose one of the 'Kitbasher Series' kids from Rix Products/Plastruct, which fit my vision for the modern enginehouse that would represent the shops and the sign-up office for crews on the M&E.  It includes doors and window frames, which I cut in as I saw fit for the entrance and yard office.   I also framed out a small office in the corner of the interior. 

While the structure progressed, I graded the foundation area with sculptamold, filling in any gaps between the yard surfaces and the fascia.   Styrene strips were used to frame out the edges of the pour I would make for the concrete floor of the shops.


Smaller strips were tucked in along the gauge side (inside) of each rail for the pour.  I mixed a batch of hydrocal plaster to the consistency of loose sour cream - thick, but pourable.  It was poured along a guide dowel into the corners first, and then tamped down to minimize air bubbles.  After about 15 minutes it was hard enough to gently pull away the forms, and shape the edges accordingly.


After it cured overnight, I stained the new foundation with a variety of burnt Sienna and gray colors to achieve a look of well-worn concrete.   Once the paint dried I weathered the surface with chalks and black stains.  As this is a light repair facility, I did not include any inspection pit or drop tables - this tiny facility for a short line wouldn't have that sort of investment.


I added interior lighting and some interior details, enough to suggest a well-equipped facility for inspections and repairs.  The structure was weathered with dull coat, then just a light application of pastels and oil washes to replicate a well-used but newer and well-maintained structure.

A wheelset storage track was added before a layer of black cinder and yard ballast, which is shown above curing with some sand piles and grit along the rails. 

Next steps here are ballast highlights, vegetation, and some more detail to complete the scene.  M&E crews will now have a much more prototypical scene from which to start and end their runs!


Tuesday, October 18, 2016

A Sweeping Upgrade

Last night, we hung the first of the new photo backdrops on the Onondaga Cutoff.   This marks the beginning of the installation of the large, 12' long photo backdrops, the final step in was has been a 2-year process of planning, re-planning, research, design, and purchasing.   Backdrops are about the most visible, and least appreciated, of all the components of a layout, and I wanted to make sure that what I was installing was exactly what I would be satisfied with in the long term.

We started the installation on the M&E, since the backdrop here is stand-alone and not connected to other sections.  Better to make beginner's mistakes on an isolated area!  First, I moved all the rolling stock out of Euclid Yard, and then removed all the structures and building flats that had been in place for several years.  None of the scenic elements had been glued in place, as I expected that I'd have to move it all eventually for this process.


The original backdrop here is better than nothing, but is very primitive - I'm no artist painter!  Images like this are what made me take a hard look at my progress.  By 1980's standards, these backdrops would have been sufficient - not perfect, but good enough to match the quality of the models and other scenery.  With detailed and weathered models rolling on quality scale track, with scale ballast and foliage, the backdrops became an increasingly crude part of the scene.  Too much effort has been put into the rest of the railroad to settle for simple painted backdrops in shallow scenes.


The areas for the backdrops were measured very carefully, 3 different times on different days, to ensure the numbers were correct.  Jason and I cut the backdrops to fit, again measuring 3 times before making any cuts.  With custom prints, a wrong cut would be very difficult to deal with - there are no backups here!

Since this was the first try, we unrolled the whole sheet for a test hang with some painter's tape.  The measurements were correct and we were ready to begin.  I followed the directions posted at http://backdropwarehouse.com/Mounting6.htm - we were careful to think through each step and have a 'job briefing' before starting.  As suggested in that article, I used Elmer's Rubber Cement.  I brushed a 3-inch strip of cement vertically, as well as a 3-inch strip horizontally at the top, middle, and bottom of the painted backdrop.  Working foot by foot, we fastened the left side first, and then I unrolled and gently pulled the backdrop along while Jason used a new, try 3/8" nap paint roller to push the backdrop into the wet cement.  We had to re-adjust several times as we started to get the perfectly level installation, and the cement allows for that since the paper was such a heavy grade.

As we worked along, it quickly became apparent that this was going to be a sweeping, dramatic improvement to the scene.  Once we started, it was a continual process to spread glue, unroll, press into place, then spread more glue, etc.  It went quickly once we began - the planning had paid off!

After it was unrolled, we stood back, and it really impressed us.


Suddenly, this scene developed a depth and level of detail that would have been virtually impossible with paint.  The paper was nicely adhered to the backdrop, and so I put some structures and foliage back on the layout, and moved the cars back in - and the results are really something else.  Here's a view looking railroad south towards the Peter Doelger Brewery:


Even with no additional ballast or foliage work, the 'finished' look of the scene is very apparent!  With that level of detail, my simple mock-ups for the brewery itself have been replaced with some simple flats temporarily until I make time to assemble the brewery structures, weather them, and install them permanently.  


 Finally a close up view of some equipment in the yard, again showing how the backdrop alone takes this scene from a simple, unfinished view to a view with unlimited depth, allowing focus to fall on the stars of the show - the rolling stock.  Even this old Model Die Casting flat car that I built in high school looks good!

I'm excited with this, and this really gets me inspired to keep the ball rolling and get the rest of these backdrops up this fall and winter.  Jason will be helping with the cuts and the installations, so watch for more of those soon.  It feels like we have turned a corner on the Onondaga Cutoff - now, with this in place, the 'final' versions of these scenes come into focus and will be moving forward.  This is an exciting step in the right direction and a top-notch compliment the operation!

~RGDave