Showing posts with label overhead bridge. Show all posts

Friday, August 5, 2022

Fitting it all in

It is a summer of good stuff here on the Onondaga Cutoff, and we are busy with family, travel, and future plans while doing our best to stay present. 

One of the projects recently finished to completion is Woodchuck Hill Road and its overhead bridge over the Chicago Line at MP 279.69.  As part of the photo shoot for an article in this month's Railroad Model Craftsman magazine, I took a few extra frames playing with backlight and some new angles.

Here we have ML-401 pausing at CP280 on its westbound trip to wait for an eastbound to cross over in front of him, as the sun begins to set in the west.  YAON-20, the evening yard job, is also working on the East Lead and in the far distance the M&E is tying down for the night too.  You can also see the labels for the road, which I use to help crews know where they are during operating sessions.    

I also played with a few vertical angles of the new bridge, of which this one is a favorite.   This is UBO-44A, a coal load for the Bow, NH power plant.  


Still, nothing worth doing is ever that easy.  For this shot above I created a sheet of sky backdrop with spray paint, representing a humid summer sky, and hung it from the ceiling to block the view of the wall of the layout room.  This brightened the photo and allows your eye to go right to the train without distraction.  The downside is this shot took more than an hour to set up!  But I think it was worth it.  We have to fit in opportunities for creativity when we can.

A few images from a recent family trip across the country are coming soon too.  Summer is rarely a quiet time in the Abeles family!  I hope you are enjoying yours as much as we are enjoying ours.

Thursday, September 23, 2021

Finishing Touches: Woodchuck Hill Road overpass

 It's always nice to 'finish' a scene on the layout.  Any modeler will tell you that no model is ever really finished, per se; while a scene can appear complete, there is always room for more weathering whether subtle or harsh, for more detail, and for more depth.  Many scenes are good enough for now but over time may present opportunities for change.  

Still, to bring a scene to a state of completion is satisfying and compelling.  Such is the case with Woodchuck Hill Road, which was completed recently in time for a guest operating weekend on the Onondaga Cutoff.


There is nothing like a good deadline to force my hand for progress.  I learned early in life that I am not smart or driven enough to procrastinate - if I have an idea or a vision, it requires immediate action to ensure sufficient time to finish.  So, a deadline looms on my brain from its announcement until it is past, and the announcement itself is enough to keep me pushing.  

We had finished the roadway itself in the last update, now it was time to mount it on the layout!  The deck and sidewalk were glued in place with canopy glue, after a few test fits on the layout.  I used Sculptamold to fill the area below the styrene roadway on both sides of the bridge, seen above, smoothing it to shape with a putty knife and blending it into the surrounding areas.  While that cured, I went back to the workbench to finish the scratchbuilding of the New York State DOT 'box rail' guardrails that will further help tie the scene to the locale.  


Making the railings required lots of careful measuring and selecting a scale 6"x6" cross-section strip, which was available from Evergreen Styrene.


Once cured up, I painted the whole thing silver and then gave it an overcoat of dullcoat which yields a nice silver-gray look that reminds me of the galvanized finish on the railings.  

Before setting the railings, though, I had to blend in the fresh Sculptamold with the surrounding turf.  So, I painted it mud brown mixed with black, and went over the fresh wet paint immediately with a blend of static grass, which nicely blended the two together.  


I touched up the gray fascia area as well, then added the railings carefully with canopy glue - and the result really is a big upgrade.

There is a clear CNY lineage to this bridge, now, even more than before.  I am thrilled with how it turned out and excited for the upgrade.  All we need now is a few railfans on that sidewalk waiting for westbound trains - I guess a scene really never is 'finished', right? 


Tuesday, August 31, 2021

Placeholder to Permanent: Scratchbuilding a Bridge Deck

One of the side projects this summer has been building and adding a roadway deck to the overhead bridge just east of CP 280.   While this green bridge has been featured in a number of videos and photos, its high elevation creates a side view that helps hide the fact it was incomplete.  That will no longer be the case after this project!

I began by purchasing thick styrene stock from Evergreen from the local hobby shop - I used 0.080" thick stock, and could have gone more thick as well.  Still, since it would be cut with an X-acto knife, keeping it on the thin side helped in construction.  I measured the dimensions of the bridge I had kitbashed from a Walthers double-track through truss bridge (https://onondagacutoff.blogspot.com/2017/08/on-overhead-bridges.html as well as https://onondagacutoff.blogspot.com/2017/11/filling-in-blanks.html) and cutting it to fit.


Note the notches - these are needed to fit the deck around the angle braces on the bridge that help keep the prototype structure (and the model structure) square.  These needed to be carefully measured to ensure proper fit.  

I added strips of 0.080" styrene cut to a scale 18" wide as curbing to the deck with Testors Plastic Cement, and joined the additional longitudinal sections with bracing and more glue.  Panels as well as patch outlines, which on concrete decks tend to be located near joints, were scribed in by backdragging the blade with a straightedge at each floor beam per the prototype.  Several test fits also helped ensure all was lining up correctly on the layout and on the bridge itself.  


I put aside the whole deck to cure and suddenly it was three months later.  I'm finding time in my forties can get away with things.  With some time over the last few days, though, each evening I headed down for more progress.  Paint came first, and I used several different sprays with colors I had on hand.  

Aircraft gray primer from Testors was used for the worn asphalt approaches. For the deck, which is modeled to resemble poured concrete, I took a tip from the military aircraft modelers who do a wonderful job with 'marbled' weathering by layering sprayed paints, starting with dark on all the seams and overcoating with several light coats of different grays.  This way the seams have a dark depth that they don't otherwise have.  I also added a layer of Rust-Oleum textured rust paint to give the surface some grit.  I also did the same process for the sidewalks with a different seam pattern per most prototype concrete sidewalks we see.   The result was a nice varied surface that resembled old concrete.  

Another military modeling tip was to use Pledge Future Shine instead of glosscoat ahead of decals.  I gave that a shot, too.

Brushed on per the instructions, the product flattened right out and created a high-gloss finish that was nice and thick.  (Normally I'd have sprayed it through the airbrush, but given the application I wanted it thicker anyway.)  On the curved section, I left the Future coat off, since I am painting those curved lines.


I used a large aluminum 'Brooklyn Brewery' wall sign as a template for my curves - it matched perfectly and gave me a constant curve for the cuts.  Cuts were made with masking tape on glass and carefully reapplied to the road.  A quick airbrush spray with an old bottle of C&O yellow from Floquil gave me good results, and the only paint bleed over was fixed with more hand-mixed gray along the yellow line.  

The remainder of the striping is decals from Summit Custom, and they worked very well.  Over several nights I installed them, again measuring carefully to keep all in line.


The gloss helps you see the nice texture added by the Rust Oleum which, while the particles are a bit large for HO scale, will give a nice 'not-perfect' feel once finished.   

Once the decals cured, I sprayed the whole deck with two coats of Testors Dullcoat and one of Tamiya Flat, to ensure no shine remained.  It covered perfectly and I moved on to weathering.  Roads get most dirty not where the tires roll but where the oil drips from engines and chassis build up over time - the middle of each lane.  I also added a few patches with gray paint mixed to appear like worn asphalt.

To my eye the decals really make it pop!  The weathering helps too, and the deck is coming together well now.  Last night I used canopy glue to cover the floor beams on the truss, where I used files and heavy small objects to hold the deck flush while the glue cures.


Once this cures up, the final step on the workbench will be to scratchbuild the New York State DOT guardrails and install them behind the curbing, and then for the final install on the layout.  That's my next project for the next month!

Each structure and detail takes time and I believe it's better to install items in stages rather than have them sit on the workbench for years.  This bridge is a favorite of several OC regular operators as well as Railroad Model Craftsman editor Otto Vondrak, and has been featured in RMC and MR photographs.  That's proof positive that there are times when it's better to work in stages on big projects like this one - the permanent scenic element can be the placeholder as well!

Monday, November 13, 2017

Filling in the Blanks

Progress comes in waves.  Scenery on a model railroad, much like other projects that are largely subjective, will linger for months or even years - and then once you begin moving on one part, you move to finish that and the next part falls in line.   There is a momentum to scenery, one good thing helps lead to the next.

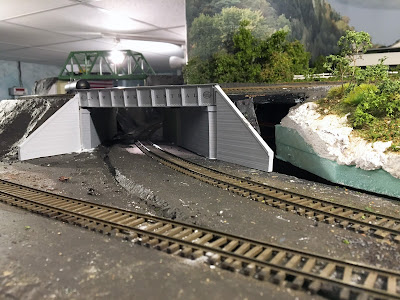
With the embankment from the last entry now cured, I gave it an overcoat of paint to blend it in.  Note how the underpass for the Cazenovia Industrial, to the far left, virtually disappears now.  Once this is covered with foliage and trees it is going to blend in perfectly.


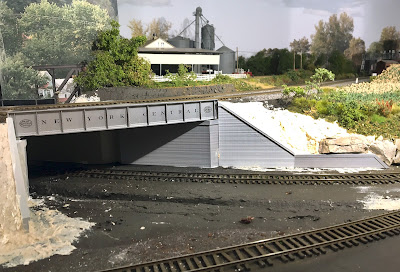
A closer view of the bridge, its abutments and wingwalls, and surrounding embankments:


Rolling with that momentum, it was time now to finalize the last piece of the embankment in this area of the layout, around undergrade bridge 279.17.  This is a tricky area with geometry, with a heavily skewed angle due to the geometry of the Cazenovia Industrial Track below the main line.

A first image shows the abutments and wing walls with a test fit.  It required two abutments one each side of the underpass, because when a bridge is skewed, the walls beneath get longer if the width above is constant.  This one is so skewed - approximately 50 degrees from square - that two abutments below, side by side, worked out well.   Those were glued in place with latex adhesive caulk, and allowed to cure overnight.   Then I set the wingwalls in place to see how those would fit.


The next step was to mix a batch of sculptamold and fill in the areas behind the wingwall, taking care to match the geometry of the landforms beyond.  I began with crumpled paper towels as a backer for the plaster.  The wingwalls are just set against the wet sculptamold, and carefully adjusted so that when the plaster cures, the whole assembly is solid.  Here's an overview once the contours were finished and the walls set in their permanent places:


And, finally, a tighter view showing the angle under the railroad.  The vision here is that the entire cut beyond will be heavily canopied with vegetation and tree growth, hiding the angle and the route of the track once it rounds the curve as seen here:


Plenty of paint and weathering are coming here soon, and once again the momentum of the scenery process will lead to regular progress into the wintertime.   My goal is to have both bridges fully weathered and mounted in place, and the surrounding area seen here completely covered with foliage before the end of the winter.  As always, I will keep you posted!

~RGDave

Monday, August 21, 2017

On Overhead Bridges

The next major installation of scenery will be installed just east from CP 280, an area where the mainline curves around the big peninsula on the Onondaga Cutoff.  Seeing that there are no locations on the Chicago Line where the railroad does a 180-degree turn within one line of sight, it is visually important to break this scene up.

I began by assembling pieces of several kits and setting them in place to get a feel.


We have the Rix Products concrete viaduct piers in the foreground, and the Walthers Double Track through truss rough assembly behind.  This is a big visual change and so it's important to mock up the general idea before deciding on the exact approach and location.  I decided I'd like to handle this with an overhead highway bridge, evocative of the big through-truss spans that were common across Central New York through the 20th century  - including one that stood at the west end of Dewitt Yard in Syracuse, NY.

Such roadway bridges are not as common as I expected in HO scale, short of custom brass models - and I cannot justify spending hundreds and hundreds on a bridge that won't carry trains.  I decided to use a Walthers through-truss kit, and kitbash it to better resemble a highway bridge.  (The concrete bridge seen above will be located further east in the town of Fayetteville.)

The stock Walthers truss is a kit for a bridge to carry railroad tracks.  While similar, highway truss bridges tend to have bridge members that are somewhat smaller in size, since they carry less weight.  To capture that feel, I used the trusses and floor system from the Walthers kit but replaced most of the bracing with lighter-gauge lattice from Micro-Engineering city viaduct kits.  Some splicing was required.  Those pieces were allowed to cure overnight.


It's summertime, and that means lots of time with the kids.  I brought the kit and my tools up from the basement and worked on the kitbash while they played.  You can see the main kit on the right above, and the ME kit to the left, with a happy 6-month-old Pete behind in his bouncer (which he loves).


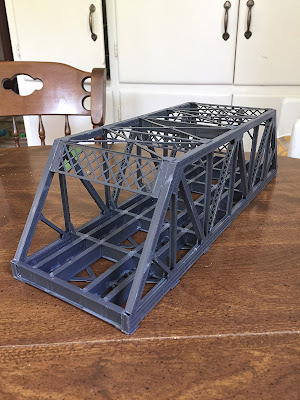
Later, as I enjoyed coffee and the kids ate breakfast, I brought the project to the kitchen table and continued my work.  I inserted the assembled lattice kitbashes, and glued the trusses to the floor system all at once while the kids asked questions.  Susie helped (under a watchful eye) with some of the assembly.


Here's the current status of the bridge, which will get Micro Engineering bearings and DOT green paint and weathering before a concrete-and-asphalt deck.   You can see the lacy horizontal webbing, which is much more evocative of a highway span than of a railroad span.  I also used the stock ME bracing lattice on several of the vertical members, helping too do differentiate this bridge from the stock kit.

Given its prominent location on the main line, this will be the centerpiece of the next scene.  It's fun to share some of the assembly process with the kids, and to see this scene get started.  We are setting up for a fun autumn and winter of progress on the Onondaga Cutoff!

~RGDave

P.S. - enjoy the rare total eclipse of the sun today, which will be going on when this blog entry is posted!