Friday, June 21, 2013

Backdrop Experiments

With a bit of downtime awaiting the delivery of the next batch of signals, I decided it was time to take a first shot at painting some of the backdrop that I had installed last year.  It had been painted a light, sky blue color, to suggest a mild, humid late summer day in Central New York.  First, I selected a light grayish blue green for the distant hills in the Finger Lakes.  Here we are at Nine Mile Creek, looking west, with that part completed:

What a major change to the feel of the space!  Suddenly, there is a sense of distance, and the whole space to me feels much larger from this one simple change.

After painting the distant hills around the whole layout, I selected a medium green for the base coat of the closer hills, in the places on the layout that will need closer hills - namely, the M&E.  This green is too consistent to stand alone.  It will just be the first coat, intended to suggest the shaded leaves in the forest canopy.  At least one more pass will come soon with a lighter, more yellow green color, applied unevenly, to suggest highlights and leaves on the surface of the canopy.  I also plan to paint clear areas with rows, to suggest distant farm fields.


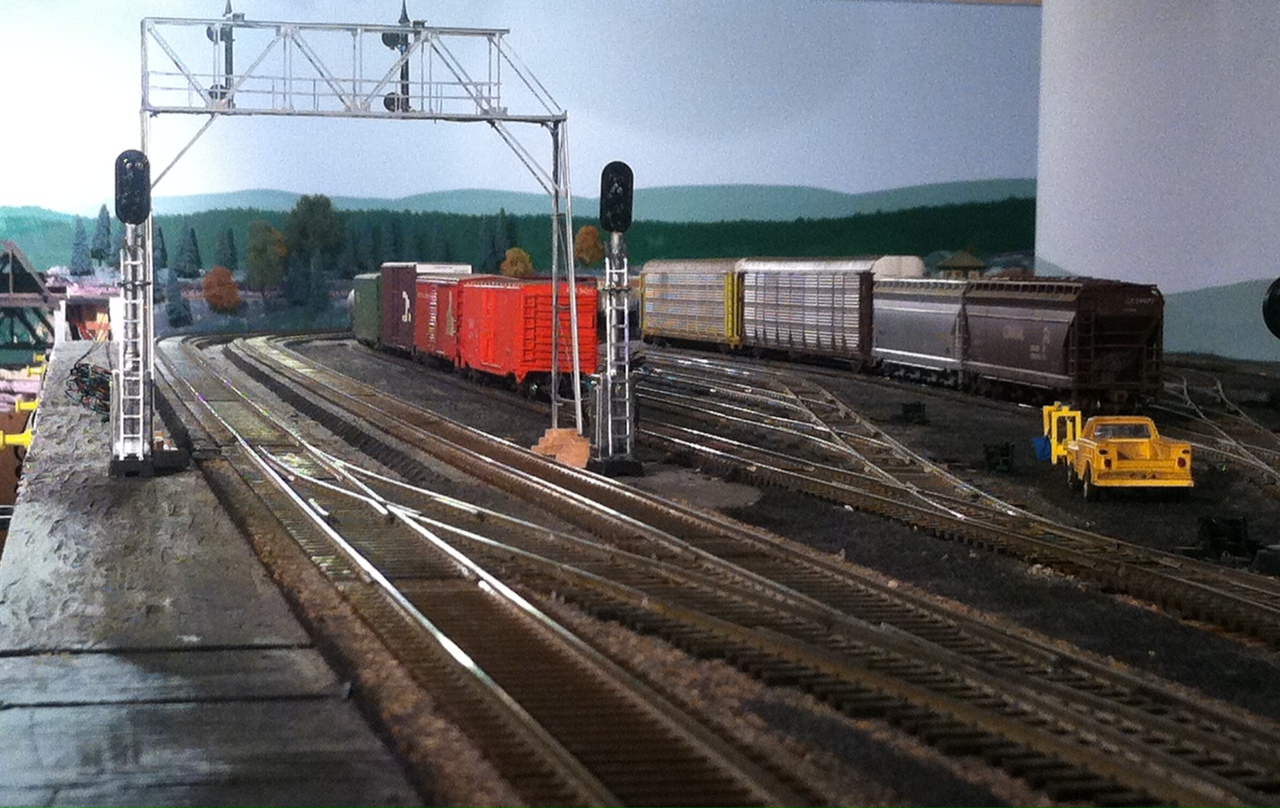
Even with that said, however, when viewed from a distance, I am still excited with the illusion that the backdrop now provides, even with just these simple shapes painted onto the backdrop.  Here's a quick snapshot looking west at CP280, with the new signal bridge being test-fit as well.  The backdrop in view here is the same as the area above:


I'm excited with that view, and it will only get better once I find time to paint the highlights on the closer hills!  I am just a beginner with artistic painting like this - in fact, I haven't done any of it for decades.  I will be experimenting with techniques I have read about and am always open to any suggestions.

Enjoy the start of the summer - more progress coming soon!

~RGDave

Friday, June 14, 2013

Another Finished Product...

One challenging thing about the construction of a model railroad is that the time available to dedicate to construction is limited.  For me, my life is centered around my baby daughter and my wife, as well as a full-time career; all of that is in front of commitments to family and friends.  Then comes the model railroad, which splits time with activities that involve 'real' trains.  And even time allotted to the layout is split between operating sessions and actual, physical construction of the layout or of equipment.

Because of the limited time available to dedicate to progress on the model railroad, there is no current part of the layout that is finished.  It has been about 6 years in construction, including preparation of the space itself, and yet there are years more to pass before much of the layout will have any finished scenery.  Therefore, when I am able to install something that will be visible on the finished product, I am excited to be working on something 'final.'  The track and signals atop the railroad fall into that category, and so do the local control panels (LCP's) that allow for local control of the interlockings.


This week, after much preparation and wiring, I was finally able to fully install the LCP's for both CP277 and for CP274.  Each of them includes the proper momentary push-button switches to throw the turnouts, as well as indicator lights for the turnouts, all mounted on 1/8" aluminum that was printed professionally by a local sign shop.  Green lights indicate normal, red indicates reverse (crossing over).


The master toggle switch at top left allows the each panel to normally be kept 'off' which disconnects the push buttons to avoid operators inadvertently pressing buttons.  The indicator lamps work regardless of the position of the toggle.   After much discussion with operators, I decided on a plan for the indication lights.  Here again, green is normal and red is reverse, but since staging is more complicated than simply 'normal' or 'reverse,' I installed LEDs that light to show which route is clear - if the yellow light is on, the switch is thrown to that route. 

Two down, 4 more to go!  More signals are scheduled to arrive in late June, and we are hoping to have CP280 cut in before the end of August.  Enjoy the start of the summer!

~RGDave


Thursday, May 30, 2013

Rolling Into Summer

The weather here in NJ is finally beginning to feel like summer, and there's lots going on - house renovations, family get-togethers, and trips here and there, all on the horizon.  But, I filled the spring with lots of progress on the Onondaga Cutoff, and this post should bring you up to speed.

First, I have brought another locomotive on-line, this time detailing, weathering, and adding DCC to SD45-2 #6666.  It joined the fleet last week.  These locomotives were purchased by Erie Lackawanna, a Conrail predecessor, and were therefore always fun to see in real life.  They spent most of the Conrail careers around Cresson, PA, as helpers and coal train power.  However, there was a period in the mid-90's when they were leased to Canadian National Railway for several months, and therefore I can plausibly say this one is spending time on the Chicago Line as part of the CR/CN pool power agreement on trains CNSE and SECN, to and from Selkirk Yard near Albany, NY.

The mechanical department is also working to fill the roster with freight cars to serve industries on the railroad as part of a larger freight car forwarding plan that is currently under development.  Such a plan would organize car movements and help to manage yard capacity during operating sessions - stay tuned for more news on this as it comes to fruition.  Here we see a string of tank cars fresh from the work bench, ready for service.

And, while working on locomotives and cars, the signal project continues as well. I spent an evening with Rick this week, using his drill press to create the holes that will be used to mount the push-button switches and the indicator lights in each Local Control Panel. 

And, our little Susie is doing wonderfully - she is growing each day and is one of the happiest babies that I have met!  She's crawling, smiling, beginning to talk - every day is exciting with her and her mom is just the best mother I could have hoped for.  Good times.  :-)


Summertime will certainly bring along many activities that do not include the Onondaga Cutoff, but I will fit in progress where I can - and bring you updates here as they happen.  Enjoy the season!

~RGDave

Friday, May 24, 2013

The Next Cut-In

Tuesday of this week, thanks again to Nick and this time, Jack as well, we have another major step forward on the Onondaga Cutoff - the second of 6 interlockings is cut-in and fully computer controlled!  Tuesday, May 21, just before midnight, manual signals were removed from service and new, fully functional interlocking signals were placed in service at CP274, the easternmost interlocking on the railroad.

Here, we see the eastbound home signals for CP274, looking east with the Island East Lead coming in from the left, then Track 1, then Track 2 to the right.   The LEDs are nice and bright, and when seen in person, they appear considerably more red than these photos would suggest.  The brightness will be important, since as you can see, this is the lower level and will be covered by scenery above in the future.  Crews will be able to view their trains on the lower level from the side at this spot. 

Next, we move to the westbound home signals for CP274, all of which are visible in this image looking west out of staging.  Tracks here are S5 in the immediate foreground to the left, then S4, S3, S2, and finally S1 all the way to the far right.  

Single-head dwarfs guard the entrances to CP274 off S5, S4, and S3, due to the fact that the best aspect a crew can get out of staging is a slow clear (green) from these tracks.  Since all three of those tracks must pass through the #5 switch, which is a diverging move, that is the best aspect.

However, since on S2 and S1 trains do not necessarily need to diverge, a better signal aspect can be displayed, which requires another head on the dwarf signals.  Green over Green allows for a 'clear' aspect.  Seen here, S2 west is displaying green over flashing red, 'Medium Clear' for a westbound move from S2 to Track 1 west.

While we were able to get CP274 cut in in just one night, just like CP277, this belies the amount of work that was completed - CP274 is significantly larger than CP277, and so required much more work with both signals and switches.  While I worked to wire signals and Nick entered data into the CATS software and JMRI in the computer, Jack worked on the other side simultaneously, and wired switches to the SE8c.  This extra effort was absolutely essential to finish the work in one night.

As you can see, another major step forward was to receive the final LCP's from the print shop - now that we are doing cut-ins for the real interlockings and signals, it is time to begin to install the LCPs to compliment that effort!  The only work remaining for me to do is to finish up the wiring in the local control panel (LCP) for CP274 as well as the first cut-in, CP277.  That said, Nick's design worked perfectly for the panels!  A blog post on this process is coming soon, but I wanted to show you what they look like - I'm very happy with how these are turning out.

Summer is slow to arrive this year in New Jersey, but progress on the Onondaga Cutoff is benefiting from that!

~RGDave
Thursday, May 2, 2013

What a Difference!


On the tail end of downtime while we wait for more signals to arrive, I decided to put a little ballast down and set up a handful of trees that have been sitting around for years under the layout on the recently-applied hardshell terrain on the M&E.  All of this is temporary, since I have more painting to do on the backdrop and more ground cover to apply as well.  But, what a difference it makes!


This is the area just north of Skaneateles Creek, and it really does look nice, especially when viewed along the tracks like this.  Nice to have one spot with some scenery in place.  It offers an immediate taste of just how much more fun it will be to run trains during an operating session over a railroad with scenery!  Signals first, scenery follows. 

This is the 100th post in this blog - I'm excited about that, and happy to be bringing you the next 100 as we continue to build the railroad.

~RGDave


Sunday, April 28, 2013

Hardshell, and a Visit!

Now that the cardboard web 'skeleton' for the hardshell scenery on the M&E was in place, I found a bit of time over the weekend to apply some plaster-infused gauze for the actual surface of the hardshell.  This was the first time I'd tried anything with hardshell scenery, and while the rumors of the general messy application process can be true, the results are worth it.  It is a very durable surface once cured, and it can be done with no filing or cutting down of foam, so it works very well for non-cliff surfaces.  Here's the area just north of Skaneateles Creek on the M&E, with fresh hardshell curing.


Next will come some scenery for this location, although much of that will be a trial and will be temporary, pending some additional painting on the backdrop and the final construction of the cliffs at Skaneateles Creek.

A separate, and more significant, note is that this weekend was the annual meeting of ProRail (http://njprorail.org/), an organization of layout owners and modelers that work to replicate prototypical operations on their model railroads.  This year's meeting happened to be in New Jersey.  Thanks to my friend Rich W., I was introduced to one of the members of ProRail several weeks ago, and he was able to attend a recent operating session on the Onondaga Cutoff.  He then invited me to visit during the ProRail operating session, which I did.  What a great experience!  His railroad ran very well, and it was a pleasure meeting so many serious modelers (and operators).  Most exciting for me, several of the guys took an interest in what they heard of my railroad, and about 15 gentlemen from ProRail made a quick stop that afternoon to see the Onondaga Cutoff!  It was an honor to give them a quick tour of the layout and the operation, and to run a few trains around the railroad for them.  I hope to be part of that organization some day and, as always, it was a pleasure to share the railroad with visitors!

Summer is around the corner, so layout time will decrease as it usually does this time of year, but these are exciting times for my layout.  All the time ahead that I am able to spend on it will yield significant results!

~RGDave

Friday, April 26, 2013

For A Change of Pace...

Signal construction has occupied most of my thought and effort over the last few months on the Onondaga Cutoff, as you can see from the last few months of posts here.  While most of the components are now on hand, we are waiting for delivery of more signals and of the local control panels - both key items that need to be on hand before we proceed.  And, signals will come before scenery, since working beneath the roadbed is easier before everything is hidden by scenery!

In the mean time, however, I decided to begin some scenery construction on the M&E, since it will not have signals.  I have never done open-grid scenery construction, so I read up on techniques and settled on the hardshell method in some spots, and the foam board method in others.

Here, we see the Skaneateles Creek bridge on the M&E, which has been in place for more than a year.  However, it was temporarily supported, so I began my scenery work by installing the abutments for the bridge.  Once those were in place, I cut cardboard strips into appropriate lengths and used hot glue to secure them on what will be a wooded hillside.  Foam will be cut to represent shale cliffs, and rock castings will also be installed to model a cliff alongside the creek, which will be the final step.

Maybe it's the springtime, but it sure is nice to be working towards some scenery at least at one spot on the Onondaga Cutoff!

~RGDave