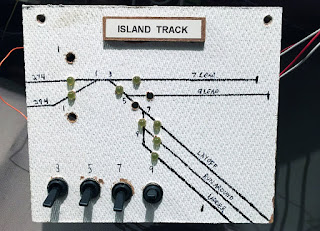
After finishing up the details last time at CP 277, it was time for me to 'bite the bullet' and tackle a job I'd been dreading for nearly 3 years: relocating the Island Control Panel, the toggle switch board that controls the turnouts leading to the Island engine storage tracks. This would require cutting in new panel, using terminal blocks to connect 14 pairs of wire with the switch machines.
Thanks to Nick A's artwork, I had the panels printed up about two years ago. They sat in the project box since then. Since it was time to get started, I began to think critically about the details, and while my brain worked on the vision I went ahead and marked the new panel up for drill locations. I drilled 5mm holes for the 5mm LED bulbs, and 1/4" holes for the push-button and the toggle switches for control of the Tortoise machines.
This created plenty of flash which I cleaned up with a #17 x-acto blade.
This particular panel was printed on PVC plastic, since it was going to be installed in an area of the fascia with some bend to it.
At last it was time to take the big step of cutting the new location into the fascia. I measured twice, drilled out the corners, and used a jigsaw to connect the dots.
While several locations had been debated, this one was selected for the ease of use by the Trainmaster, and subsequent improvement in yard efficiency. Still, always hard to make that first cut!
The new hole meant it was time to forge ahead. No going back now!
I added lights to the new panel one by one, and once the first batch were installed it was time to move the push-buttons that control the turnout hooked up to the PSX-AR board.
The PSX-AR can be thrown by a momentary-on push button, so it was essentially a short that would throw the turnout. I'd purchased a 25' length of 14-pair, 24-gauge conductor cable. I used the first few for these push buttons and gave it a try - and no luck. The message wasn't getting to the PSX-AR before it shorted out the Island. No good! I'd hoped I wasn't in over my head with this.
What to do? I remembered from school at Syracuse that the longer you run a cable, the higher the resistance for the power. When you're talking tiny cables, that is even more of a concern. Could that be the issue here? I ran a 25' pair of 20 gauge copper wire, made the connections...and it worked. Relief!
For the rest of the toggles, however, the tiny conductor cables worked fine. So it was time to get rolling with disassembly of the old board, and moving things circuit-by-circuit to the new one. The old board held up pretty well for a temporary fixture.
I removed the mounting screws and took the wires off the back of the panel one by one.
These were then adjusted to run to a new trio of terminal strips, from which I could connect them to the 25' cable to run to the new panel.
Numbering these allowed me to match each end with the correct colors and function, so that I could attach the far end to the appropriate terminal on the new panel.
Slow steady progress is key here, and testing as we go keeps us sane. I caught a few small mistakes immediately. The idea here, like on the staging panels, is to 'follow the yellow brick road' on the panel: that's the route that is lined up. Since polarity matters with the Tortoise machines, it took some trial end error to keep it logical.
After several nights and a whole weekend of this work, though, it was coming together. I estimate it required 36 hours of work to get this right, but in the end, I am very pleased. It works perfectly. Further, finishing construction here now allows me to hang skirting and clean up the area with some new foam-rubber tiles.
Here's a view of that area of the layout now - what a difference!
Another big project brought to completion by COVID-19. I'm making lemonade out of those lemons this spring!
~RGDave


No comments:
Post a Comment