Wednesday, February 28, 2018

Coming Together - Greening up the M&E

So as February comes to a close, scenery progress continues on the M&E.  Slowly and surely this side of the aisle is coming to match the level of scenery over on Conrail.


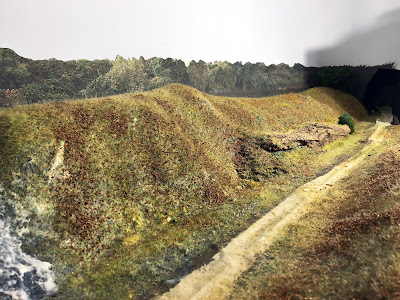
Once the paint dried, I used my mixture of diluted white glue painted over the slopes, and began to add static grass to represent the early fall.  On steeper slopes I used full strength glue to allow for better adhesion and less glue runoff.


After the grass is down I added some brown leaf flocking, as this will be forest floor area.  Everything was misted with isopropyl alcohol and a spray of diluted white glue, after which time I can remove the masking from the track areas. 


It is neat to see the track area suddenly surrounded by foliage!  


I ballasted the track with a combination of cinders, yard ballast, and some 'Northern Pacific Gray' from Arizona Rock & Mineral, and added some weeds and another light passing of the static grass to tie it all together.   Ballast was glued down with my usual mix of diluted white glue and isopropyl alcohol.  Now it's time to add trees to the forest, a final touch along with some trackside details:  the CR block limit sign, the old DLW milepost (Thanks, Al!) and old T-box.


The ditches are lined with grasses more green in color, suggesting wetter soil at the base of the rock face and along the tracks.  The trees do a nice job hiding the backdrop transitions.  

As this area greens up, progress turns to the yards at Euclid including some industries.  Stay tuned for an update on the 'new' look at Central Plastics!

~RGDave
Tuesday, February 20, 2018

The Shrinking Mountain...and Associated Progress

We've seen it before on this blog - one thing starts the ball rolling and the progress seems to accelerate.  Now that the base scenery is in on Smirnoff Hill, the progress is coming in larger pieces, at least to the eye.  The bright white plaster cures and the first step is to add the base color paint for scenery. 
 

Once the paint is in place, it's a pretty remarkable change.  Where did the hill go??  Well, it's still there of course, but it's a lot less evident now!  I added my old 'distant canopy' forest green paint, and learned again that my artists's talents are not in backdrop painting.  Yikes.


But wait...didn't I have a some more leftover photo backdrops? 

As it turns out, YES, and thank goodness.  I carefully cut out a treeline from a piece of trimming from the backdrop leftovers, and glued that along the horizon.  It was long enough to wrap around the drain pipe, too, which will hide an unsightly obstacle, especially once the 'actual' trees are planted in front.

The backdrop needed time to cure, so I spent the rest of the evening adding base rock to what will be an abandoned siding along the main track.  This will be the Dean Electrical company, honoring my mother's father as his interest in trains was a key to mine.  He was an electrical engineer and since this little company needed a name...yep.


Using the base course, which is the quarry-process available at Lowes for patio paver setting, gives us a nice rip-rap looking base.  I added some damaged track that I sprayed with textured rust-colored paint, which will do a nice job representing abandoned siding track.  Over all this I add my mixtures of Arizona Rock & Mineral 'Yard Ballast' and 'Black Cinder' with a healthy dose of Woodland Scenics fine soil-brown turf mixed in.  


A few pieces of vegetation are tossed on top, and then the area is wetted with isopropyl alcohol and diluted white glue.  It is shown here with the glue still wet and curing, but I am happy how it is coming out!  

As this week goes on I will ride the wave and keep this work rolling.  I'm working to keep moving while the nights are still long, and while outdoor chores are still minimal.  If all goes well, the M&E will have a much more completed look before the winter is through!

~RGDave  

Monday, February 12, 2018

Making a Mole Hill from a Mountain

You can't get around compromise in model railroading.  It will find you one way or the other, and it's best to live with it.  This is a case where overthinking can be the death of your progress.  When in doubt, look at the options, but make a decision, and move on.

It's no secret that the Minoa & Euclid, the shortline that interchanges with Conrail on the Onondaga Cutoff, is a branch that really tested this theory.   Given the constraints in the basement, grades of up to 8% were needed for the route to avoid major physical obstructions around the oil tank.  Would that function once built?   Well, if I were to worry about grades being too steep to look or operate perfectly, this branch never would have been built.

We took a risk in building it, and lo and behold, a pair of locomotives could overcome the steep grades with the short trains that ran on the branch.  But, it was only about a 25-foot run.  My buddy Rick Smirnoff who was instrumental with the benchwork construction suggested to extend the plan around a nook in the foundation for the basement stairs, thus extending the run by 35 feet.   Seeing the steepness work at one spot allowed me to move ahead with this one, and Smirnoff Hill was born! 
That said, it's not pretty, and doesn't appear very prototypical.  The next challenge is tricking the eye with scenery so that we don't focus on the grade as much.


This area had recieved some early experimental scenery that is not up to snuff with my latest efforts, so I am taking another look and will change most of it.  I started with installing my standard cardboard webbing, noting how hills next to the track did a nice job of hiding the grades on other parts of the railroad.  When other areas are steeper, the track appears more reasonably level.


After all that was in place, I cut a piece of 1/8"hardboard Masonite to fit the front of the benchwork as fascia, and used that to attach more webbing with hot glue.  That can quickly be followed by plaster gauze for hardshell, and sculptamold as a final ground surface before paint.  Lots more to come here, it will be a challenge to close this scene out with the workbench so close at hand.


Speaking of the workbench, it was well past time to clean it up.  What a mess.  I cleared the whole surface, and put things back as organized.  Containers for parts and rags, glues, paints, etc now are separate trays rescued from the old toy bin.  This way I can stack those next to the space, and therefore only put them on the surface when they are needed.

Progress, here and there!